Android:开发环境与项目结构
目录
资料
Android 的文档非常丰富,通过 Android docs 可以找到大量学习资料和系统手册。
Build your first Android app 给出了入门资料的学习顺序:
- Create a Hello World app:一个用 kotlin 实现的 app demo
- Start the Android Basics course:最新的推荐做法,比如摒弃了用 xml 描述布局的做法
- Browse learning resources: 更多入门&进阶教程,视频+文档
- Explore sample apps:各种功能的示例代码
- Android CodeLabs:codelabs 中的 anroid 项目
这里用的是第一部分 “Create a Hello World app” 中的例子:
- Build Your First Android App in Kotlin
- Build Your First Android App in Java
- Create XML layouts for Android
项目创建与运行
通过 Android Studio 的 File->New Project 创建一个 Basic Activity,选择 Java 或者 Kotlin 语言,选择 app 需要的最小 sdk 版本。Kotlin 语言可以通过 Kotlin 语法一站式手册 快速学习。
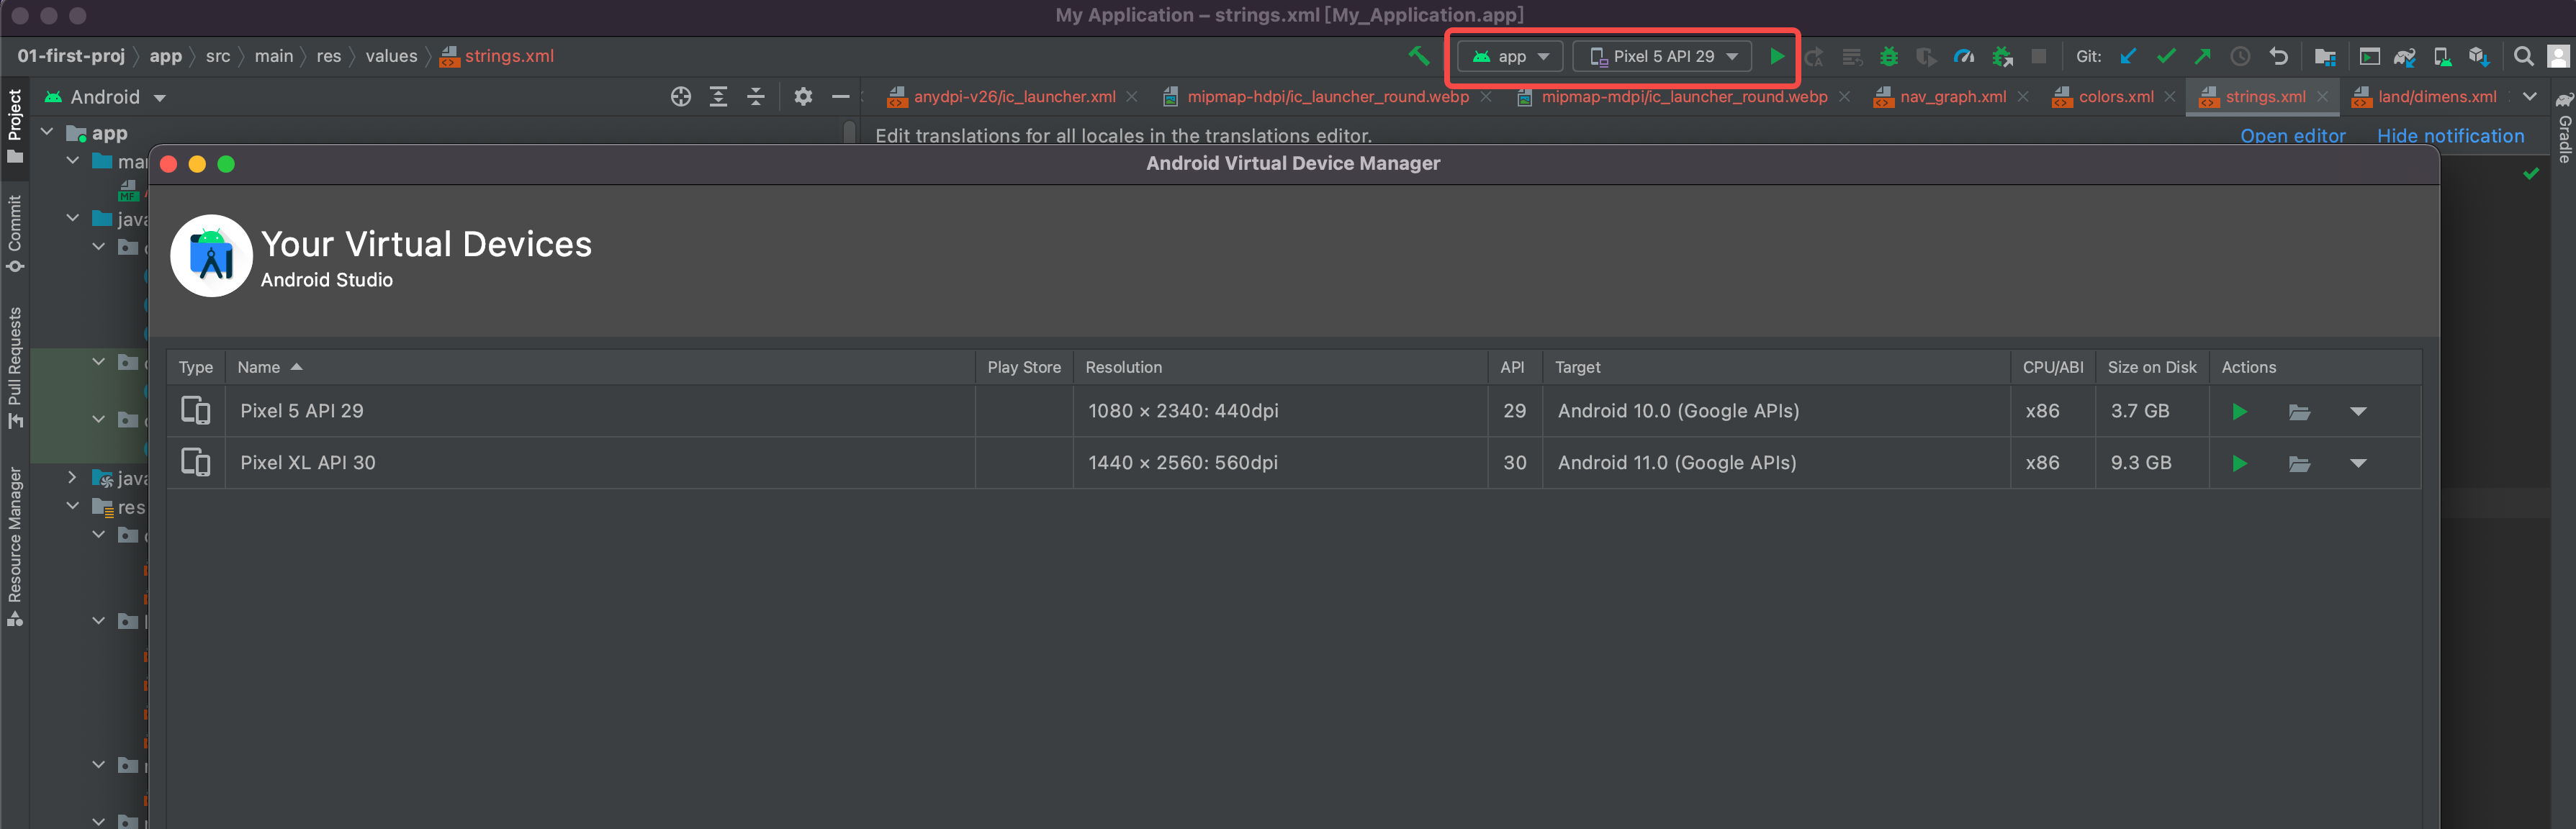
用模拟器运行
通过 Android Studio 的 Tools -> AVD Manager 安装本地安卓模拟器,然后就可以用运行按钮启动:
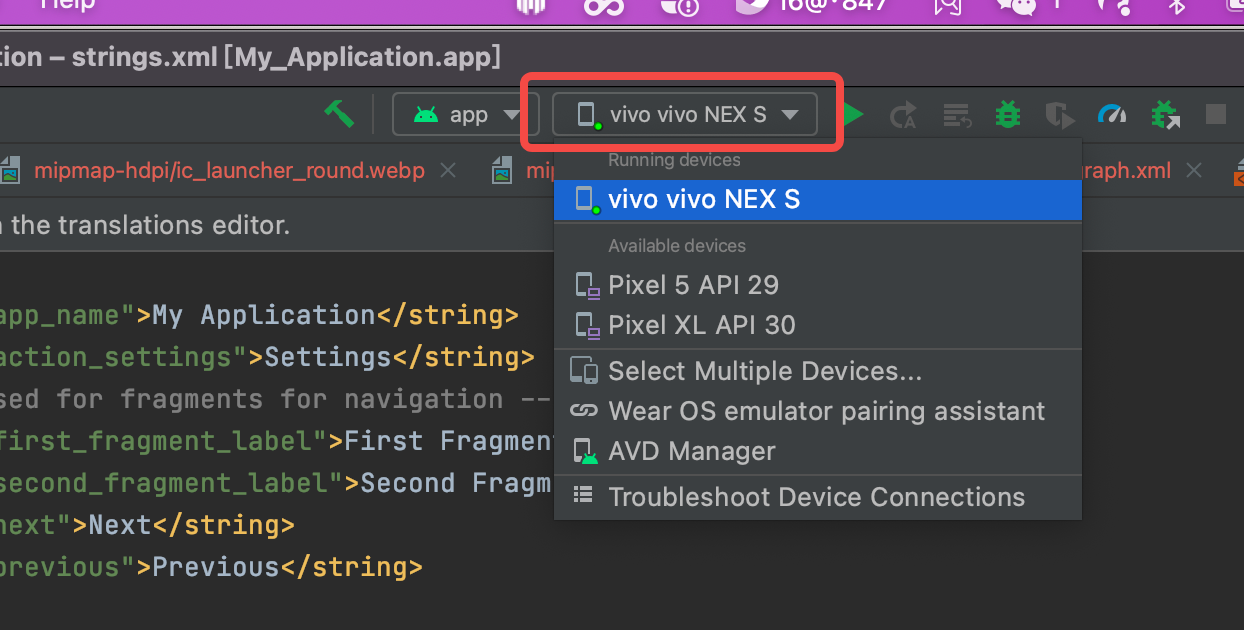
用物理设备运行
进入 android 手机的开发者设置,打开 USB 调试,将手机连上电脑,在 Android Studio 中就可以看到增加的设备,选择并运行即可。
项目结构
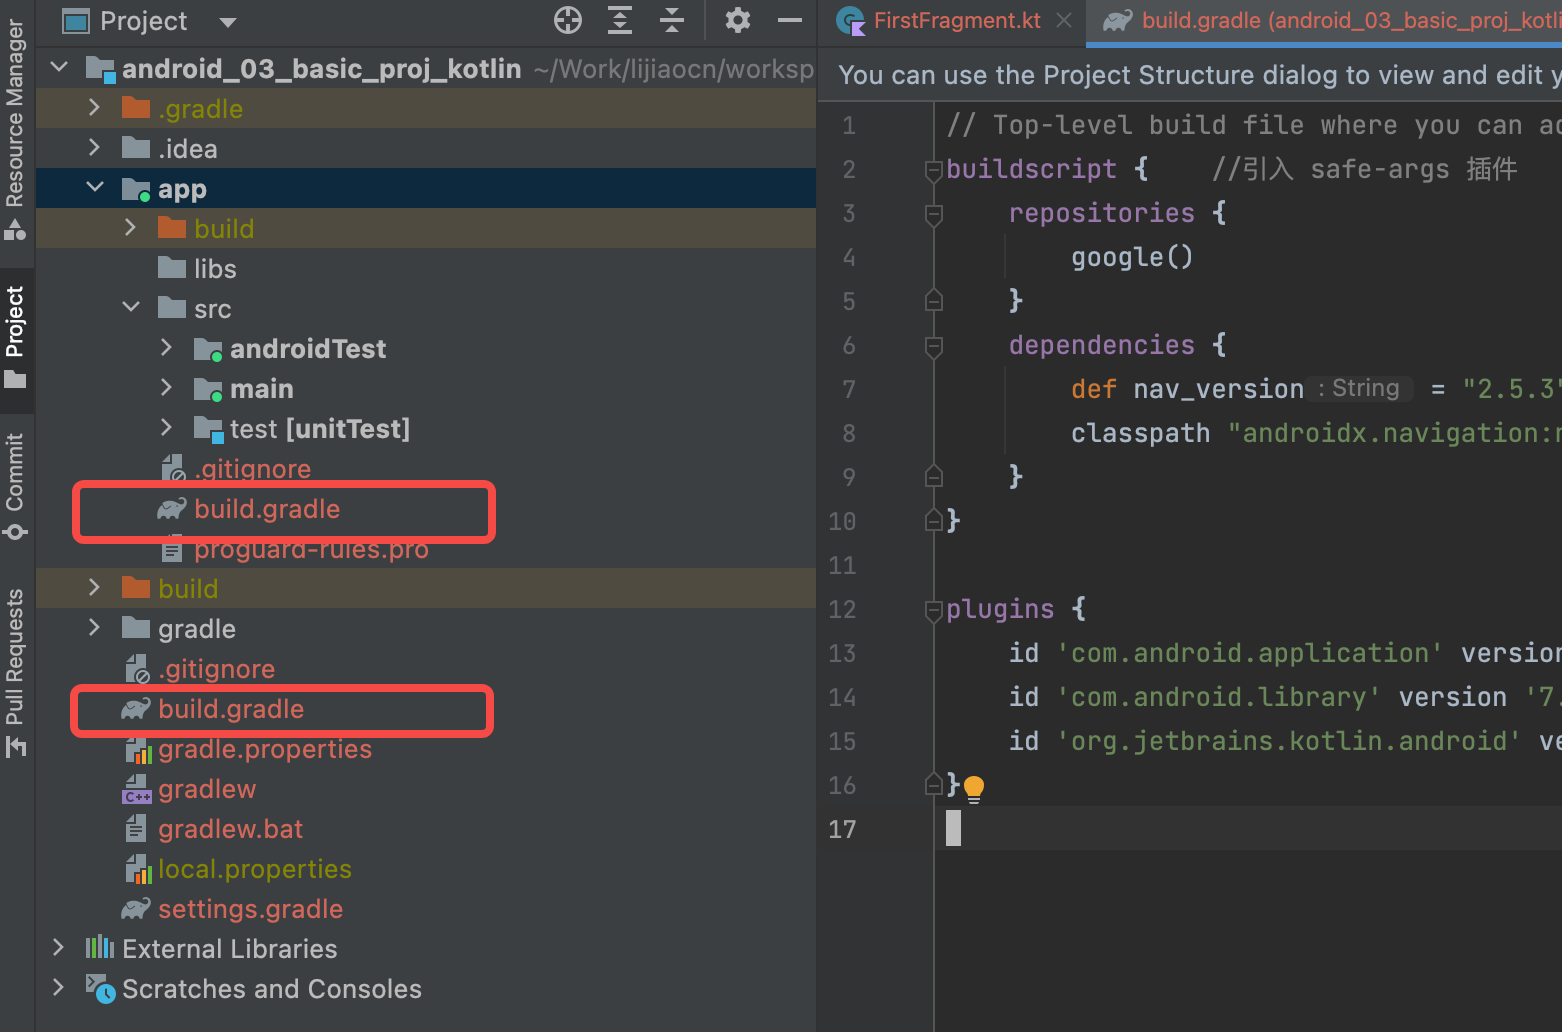
项目中有两个 build.gradle 文件:一个位于项目根目录,另一个位于 app 目录中。
源代码目录是 app/src/main:
➜  01-first-proj git:(main) ✗ ls app/src/main
AndroidManifest.xml java res
其中 AndroidManifest.xml 是对 app 内各组件的描述,android runtime 会读取该文件。
java 目录中是 app 源代码,res 目录中是 app 使用的资源文件,包括以下子目录:
- drawable 存放图片
- layout 存放每个交互界面的 UI 布局
- menu 存放 app 中的菜单
- mipmap 存放 app 的图标
- navigation 存放交互界面的切换顺讯
- values 存放颜色、字符串等自定义资源
编译打包方式
Android 项目用 gradle 进行构建,gradle 的用法见:
Android 项目中的 gradle 文件:
- settings.gradle: 定义项目名称,以及包含的子项目目录
- app/build.gradle: 子项目的构建文件
AndroidManifest.xml
App manifest overview 介绍了 AndroidManifest.xml 的用途和支持的配置项。
- AndroidManifest.xml 位于项目根目录且名称固定,提供了构建相关的信息
- 声明 app 包含的组件 activity、service、broadcast receiver、content provider
- 声明 app 需要的权限
- 声明 app 需要的硬件和软件限制
- 指定 app 的启动入口 application->activity(见启动流程)
必须包含 manifest 和 application,其它例如 activity 等根据实际情况配置。 每个标签都有众多属性,比如 application/activity/service 等,可以到 App manifest overview 中查阅。
App 启动流程
一句话描述:
- AndroidManifest.xml 指定了 .MainActivity
- .MainActivity 初始化时引用导航资源文件 R.id.nav_host_fragment_content_main
- 导航资源文件中定义了多个 fragment 以及各自的跳转动作,并指定了起始的 fragment
具体如下:
AndroidManifest.xml 中为 activity 指定了关联的类,例如下面的 .MainActivity:
<application
    android:allowBackup="true"
    android:dataExtractionRules="@xml/data_extraction_rules"
    android:fullBackupContent="@xml/backup_rules"
    android:icon="@mipmap/ic_launcher"
    android:label="@string/app_name"
    android:supportsRtl="true"
    android:theme="@style/Theme.Android_03_basic_proj_kotlin"
    tools:targetApi="31">
    <activity
        android:name=".MainActivity"     (指定activity对应的代码)
        android:exported="true"
        android:label="@string/app_name"
        android:theme="@style/Theme.Android_03_basic_proj_kotlin.NoActionBar">
        <intent-filter>
            <action android:name="android.intent.action.MAIN" />

            <category android:name="android.intent.category.LAUNCHER" />
        </intent-filter>
    </activity>
.MainActivity 在 onCreate 中指定 navController:
class MainActivity : AppCompatActivity() {
    /*...省略...*/
    override fun onCreate(savedInstanceState: Bundle?) {
        super.onCreate(savedInstanceState)

        binding = ActivityMainBinding.inflate(layoutInflater)
        setContentView(binding.root)

        setSupportActionBar(binding.toolbar)

        (指定导航资源文件)
        val navController = findNavController(R.id.nav_host_fragment_content_main)
        appBarConfiguration = AppBarConfiguration(navController.graph)
        setupActionBarWithNavController(navController, appBarConfiguration)

        binding.fab.setOnClickListener { view ->
            Snackbar.make(view, "Replace with your own action", Snackbar.LENGTH_LONG)
                .setAction("Action", null).show()
        }
    }
R.id.nav_host_fragment_content_main 对应了资源文件 res/layout/content_main.xml(文件声明了ID:@+id/nav_host_fragment_content_main)。资源文件又在属性 app:navGraph 指定了另一个 xml 文件 res/navigation/nav_graph.xml:
<?xml version="1.0" encoding="utf-8"?>
<androidx.constraintlayout.widget.ConstraintLayout xmlns:android="http://schemas.android.com/apk/res/android"
    xmlns:app="http://schemas.android.com/apk/res-auto"
    android:layout_width="match_parent"
    android:layout_height="match_parent"
    app:layout_behavior="@string/appbar_scrolling_view_behavior">

    <fragment
        android:id="@+id/nav_host_fragment_content_main"
        android:name="androidx.navigation.fragment.NavHostFragment"
        android:layout_width="0dp"
        android:layout_height="0dp"
        app:defaultNavHost="true"
        app:layout_constraintBottom_toBottomOf="parent"
        app:layout_constraintEnd_toEndOf="parent"
        app:layout_constraintStart_toStartOf="parent"
        app:layout_constraintTop_toTopOf="parent"
        app:navGraph="@navigation/nav_graph" /> (指向具体的导航图谱文件)
</androidx.constraintlayout.widget.ConstraintLayout>
nav_graph.xml 中声明了多个 fragment,在 app:startDestination 中指定了启始的 fragment。 每个 fragment 的 android:name 指定了绑定的类,action 中定义了跳转动作。
<?xml version="1.0" encoding="utf-8"?>
<navigation xmlns:android="http://schemas.android.com/apk/res/android"
    xmlns:app="http://schemas.android.com/apk/res-auto"
    xmlns:tools="http://schemas.android.com/tools"
    android:id="@+id/nav_graph"
    app:startDestination="@id/FirstFragment"> (指定初始页)

    <fragment
        android:id="@+id/FirstFragment"
        android:name="com.example.android_03_basic_proj_kotlin.FirstFragment"
        android:label="@string/first_fragment_label"
        tools:layout="@layout/fragment_first">

        <action
            android:id="@+id/action_FirstFragment_to_SecondFragment" (定义跳转动作)
            app:destination="@id/SecondFragment" />
    </fragment>
    <fragment
        android:id="@+id/SecondFragment"
        android:name="com.example.android_03_basic_proj_kotlin.SecondFragment"
        android:label="@string/second_fragment_label"
        tools:layout="@layout/fragment_second">

        <action
            android:id="@+id/action_SecondFragment_to_FirstFragment" (定义跳转动作)
            app:destination="@id/FirstFragment" />
        <argument
            android:name="random"        (当前fragment支持的传入参数)
            app:argType="integer" />
    </fragment>
</navigation>
Fragment 代码可以调用 action 跳转到其它 fragment,比如下面的 actionFirstFragmentToSecondFragment:
binding.random.setOnClickListener{
    val count = binding.textviewFirst.text.toString().toInt()
    /*跳转到另一个fragment,并传入参数count*/
    val action = FirstFragmentDirections.actionFirstFragmentToSecondFragment(count)
    findNavController().navigate(action)
}
上面用到了 navigation-safe-args-gradle-plugin 插件(支持为 fragment 传入后参数),需要分别配置项目顶层的 build.gradle 和 app 中的 build.gradle。
项目顶层的 build.gradle 中添加:
buildscript {
    repositories {
        google()
    }
    dependencies {
        def nav_version = "2.5.3"
        classpath "androidx.navigation:navigation-safe-args-gradle-plugin:$nav_version"
    }
}
app 中的 build.gradle 添加:
plugins {
  id 'androidx.navigation.safeargs.kotlin'
}
布局文件 layout/*.xml
应用中每个页面的布局也用 xml 文件描述,通常位于项目的 res/layout 目录中,参考 Create XML layouts for Android。
- 页面布局是由 ViewGroup 和 View 组织成的层级结构,ViewGroup 可以包含 View 以及其它的 ViewGroup。
- ViewGroup 和 View 都有多种不同的实现,分别对应不同的 class
- layout/ 目录中的布局文件通过 xml 标签指定使用的 class
ViewGroup
下面的 activity_main.xml 的顶层 ViewGroup 是 androidx.coordinatorlayout.widget.CoordinatorLayout(标签名即对应的 class 路径)。顶层 ViewGroup 嵌入了 AppBarLayout 等 layout,并且导入另一个 xml 文件 laytout/content_main。
<?xml version="1.0" encoding="utf-8"?>
<androidx.coordinatorlayout.widget.CoordinatorLayout xmlns:android="http://schemas.android.com/apk/res/android"
    xmlns:app="http://schemas.android.com/apk/res-auto"
    xmlns:tools="http://schemas.android.com/tools"
    android:layout_width="match_parent"
    android:layout_height="match_parent"
    tools:context=".MainActivity">

    <com.google.android.material.appbar.AppBarLayout  (对应的具体的类)
        android:layout_width="match_parent"
        android:layout_height="wrap_content"
        android:theme="@style/Theme.Android_03_basic_proj_kotlin.AppBarOverlay">

        <androidx.appcompat.widget.Toolbar
            android:id="@+id/toolbar"
            android:layout_width="match_parent"
            android:layout_height="?attr/actionBarSize"
            android:background="?attr/colorPrimary"
            app:popupTheme="@style/Theme.Android_03_basic_proj_kotlin.PopupOverlay" />

    </com.google.android.material.appbar.AppBarLayout>

    <include layout="@layout/content_main" />  (可以导入文件)

    <com.google.android.material.floatingactionbutton.FloatingActionButton
        android:id="@+id/fab"
        android:layout_width="wrap_content"
        android:layout_height="wrap_content"
        android:layout_gravity="bottom|end"
        android:layout_marginEnd="@dimen/fab_margin"
        android:layout_marginBottom="16dp"
        app:srcCompat="@android:drawable/ic_dialog_email" />

</androidx.coordinatorlayout.widget.CoordinatorLayout>
ViewGroup 实现除了 androidx.coordinatorlayout.widget.*,还有 androidx.constraintlayout.widget.* 等。
View
view 有 TextView、Button 等多种实现,位于 android.widget.* 中。
应用架构
这里只作简单记录,后续专门学习。
App component 加载顺序是不确定的,而且可能会被随时销毁,不能在 app component 中存放数据。
it’s possible for your app components to be launched individually and out-of-order, and the operating system or user can destroy them at any time. Because these events aren’t under your control, you shouldn’t store or keep in memory any application data or state in your app components, and your app components shouldn’t depend on each other.
Guide to app architecture 给出以下架构原则:
- 代码按功能分离,不要都写在 activity 和 fragment 中。Activity 和 Fragment 是连接 Android OS 和 App 的 glue classes,操作系统会在需要时将其销毁,要尽可能减少对其 Activity 和 Fragment 的依赖。
- Data model 和 UI 等组件分离且持久化。
- 每个数据都有唯一的出处(SSOT, single source of truth),且只能通过 SSOT 提供的方法修改。
- 数据保持单向流动,application data 从 data sources 流向 UI,操作事件从 UI 流向数据的唯一出处。
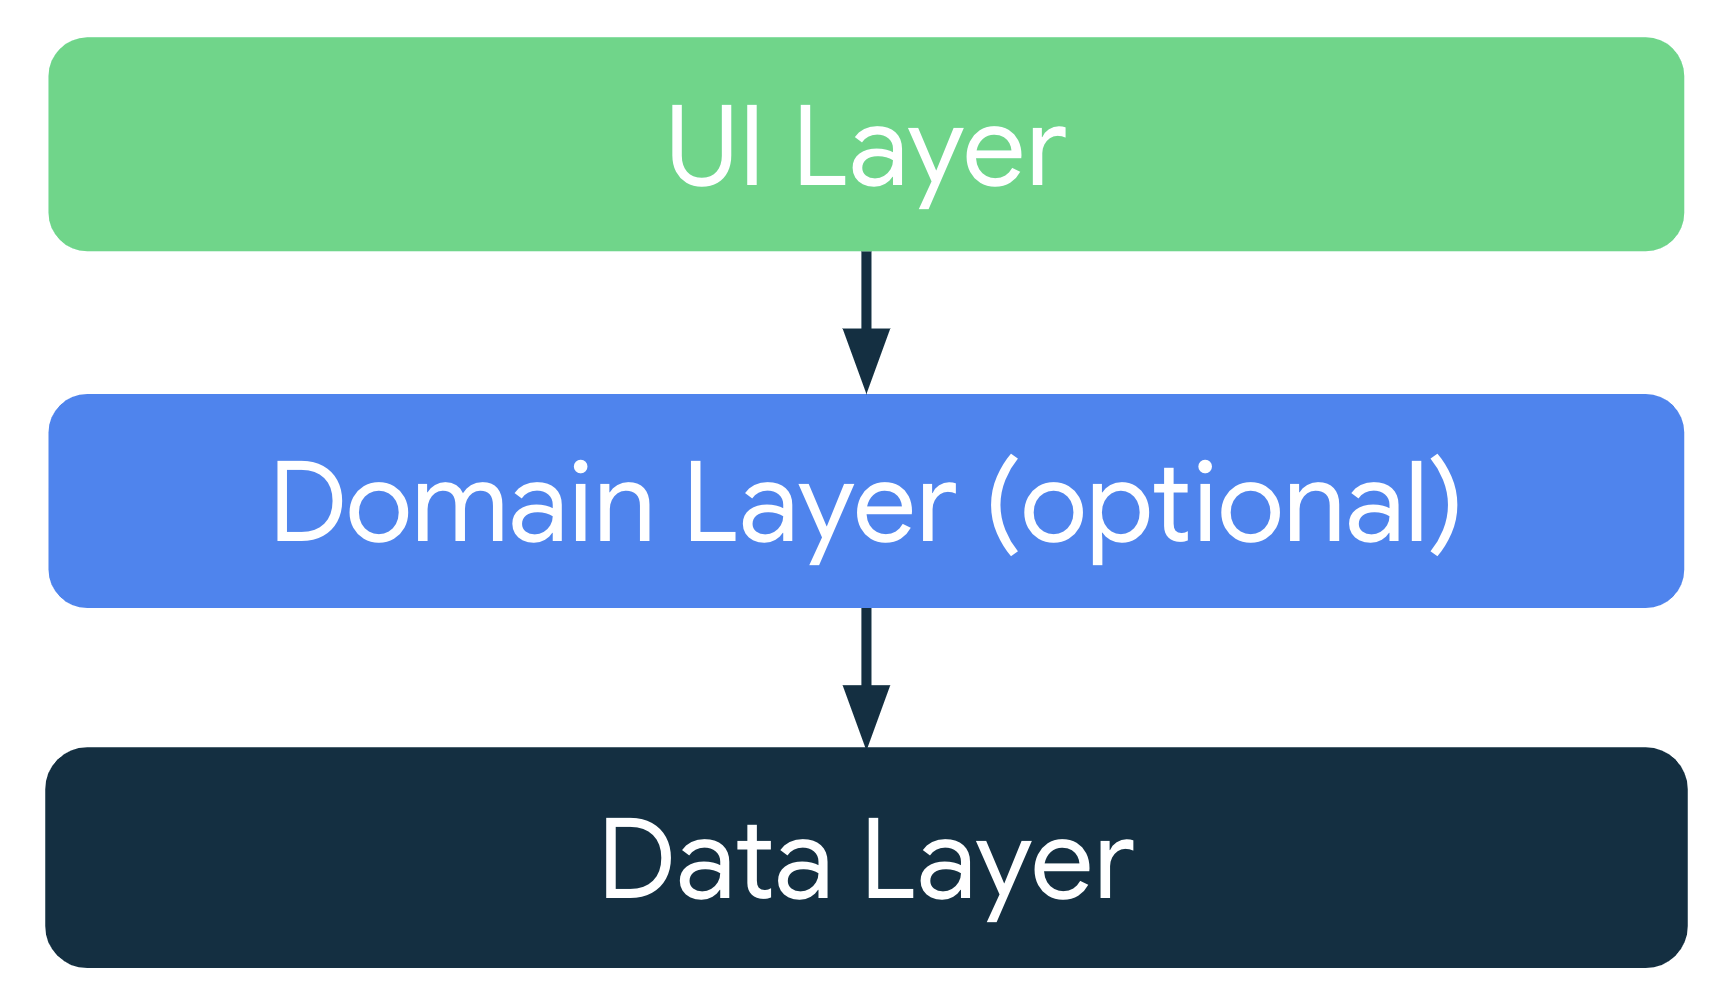
三层架构:UI Layer -> Domain Layer(optional) -> Data Layer。
示例代码
Android Samples 中提供了大量的示例代码,可以通过左边选项筛选出需要的示例。
应用架构示例
architecture-samples#stable-samples—kotlin 中包含了多个应用架构示例,分别位于不同的分支中。
git clone https://github.com/android/architecture-samples.git
architecture-single-module
git clone https://github.com/android/architecture-templates.git --branch renovate/base-kotlin
mv architecture-templates architecture-single-module
cd architecture-single-module
# 如果在 mac 需要升级 bash, brew install bash,将 /usr/local/bin/ 放在 $PATH 最前面
bash ./customizer.sh com.example.arch_single_module DataItemType ArchSingleModule
参考
- 李佶澳的博客
- Android
- Android开发课
- Build Your First Android App in Java
- Guide to app architectur
- Build Your First Android App in Kotlin
- Create XML layouts for Android
- Android Basics in Kotlin
- Modern Android App Architecture
- App manifest overview
- Building Kotlin Applications Sample
- Gradle 入门教程
- Understand the Android build system
- navigation-safe-args-gradle-plugin
- androidx.coordinatorlayout.widget.CoordinatorLayou
- androidx.constraintlayout.widget.ConstraintLayout
- android.widget.*
- architecture-samples#stable-samples—kotlin
- Android Samples
- Android Training: Browse learning resources
- Android docs
- Android CodeLabs
- Build your first Android app

推荐阅读
Copyright @2011-2019 All rights reserved. 转载请添加原文连接,合作请加微信lijiaocn或者发送邮件: [email protected],备注网站合作
友情链接: Some Online Tools Develop by Me 系统软件 程序语言 运营经验 水库文集 网络课程 微信网文