基于Envoy的ApiGateway/Ingress Controller项目梳理(一): Ambassador
目录
Ambassador
在Kubernetes的service中添加注解,ambassador多个实例独立工作,独立读取注解,更新各自的envoy配置。按照Deploying Ambassador to Kubernetes中的指导试用了一下。注意默认情况下,deployment、svc需要和ambassador位于同一个namespace,原因后面有提到,下面都部署在默认的kube-system中。
在集群中部署ambassador
集群中部署用到yaml文件特别简洁,包括权限设置、Deployment和Admin三部分:
$ ./kubectl.sh apply -f https://getambassador.io/yaml/ambassador/ambassador-rbac.yaml
镜像是quay.io/datawire/ambassador:0.61.0,可能需要翻Q。
如果Pod一直不创建,查看rs状态,出现下面的情况是因为apiserer的–admission-control中设置了SecurityContextDeny,将这个参数移除即可:
$ ./kubectl.sh describe rs ambassador-5484554b5
...
Warning  FailedCreate  3m56s                  replicaset-controller  Error creating: pods "ambassador-5484554b5-b9bfw" is forbidden: pod.Spec.SecurityContext.RunAsUser is forbidden
Warning  FailedCreate  3m56s                  replicaset-controller  Error creating: pods "ambassador-5484554b5-pz9k8" is forbidden: pod.Spec.SecurityContext.RunAsUser is forbidden
Warning  FailedCreate  3m55s                  replicaset-controller  Error creating: pods "ambassador-5484554b5-gxqjs" is forbidden: pod.Spec.SecurityContext.RunAsUser is forbidden
Warning  FailedCreate  2m14s (x7 over 3m54s)  replicaset-controller  (combined from similar events): Error creating: pods "ambassador-5484554b5-krl6q" is forbidden: pod.Spec.SecurityContext.RunAsUser is forbidden
...
确认ambassador启动:
➜  admin ./kubectl.sh get svc
NAME               TYPE        CLUSTER-IP     EXTERNAL-IP   PORT(S)          AGE
ambassador-admin   NodePort    172.16.62.42   <none>        8877:31143/TCP   57s
kubernetes         ClusterIP   172.16.0.1     <none>        443/TCP          158d
➜  admin curl http://10.10.64.58:31143/ambassador/v0/check_alive
ambassador liveness check OK (2 minutes, 17 seconds)%
管理端口的页面路径是/ambassador/v0/diag/:
http://10.10.64.58:31143/ambassador/v0/diag/
还需要把代理端口8080或8443暴露出来,例如:
---
apiVersion: v1
kind: Service
metadata:
  name: ambassador
spec:
  type: LoadBalancer
  externalTrafficPolicy: Local
  ports:
   - port: 80
     targetPort: 8080
  selector:
    service: ambassador
代理到集群外部
将/httpbin/映射到httpbin.org:80:
---
apiVersion: v1
kind: Service
metadata:
  name: httpbin
  annotations:
    getambassador.io/config: |
      ---
      apiVersion: ambassador/v1
      kind:  Mapping
      name:  httpbin_mapping
      prefix: /httpbin/
      service: httpbin.org:80
      host_rewrite: httpbin.org
spec:
  ports:
  - name: httpbin
    port: 80
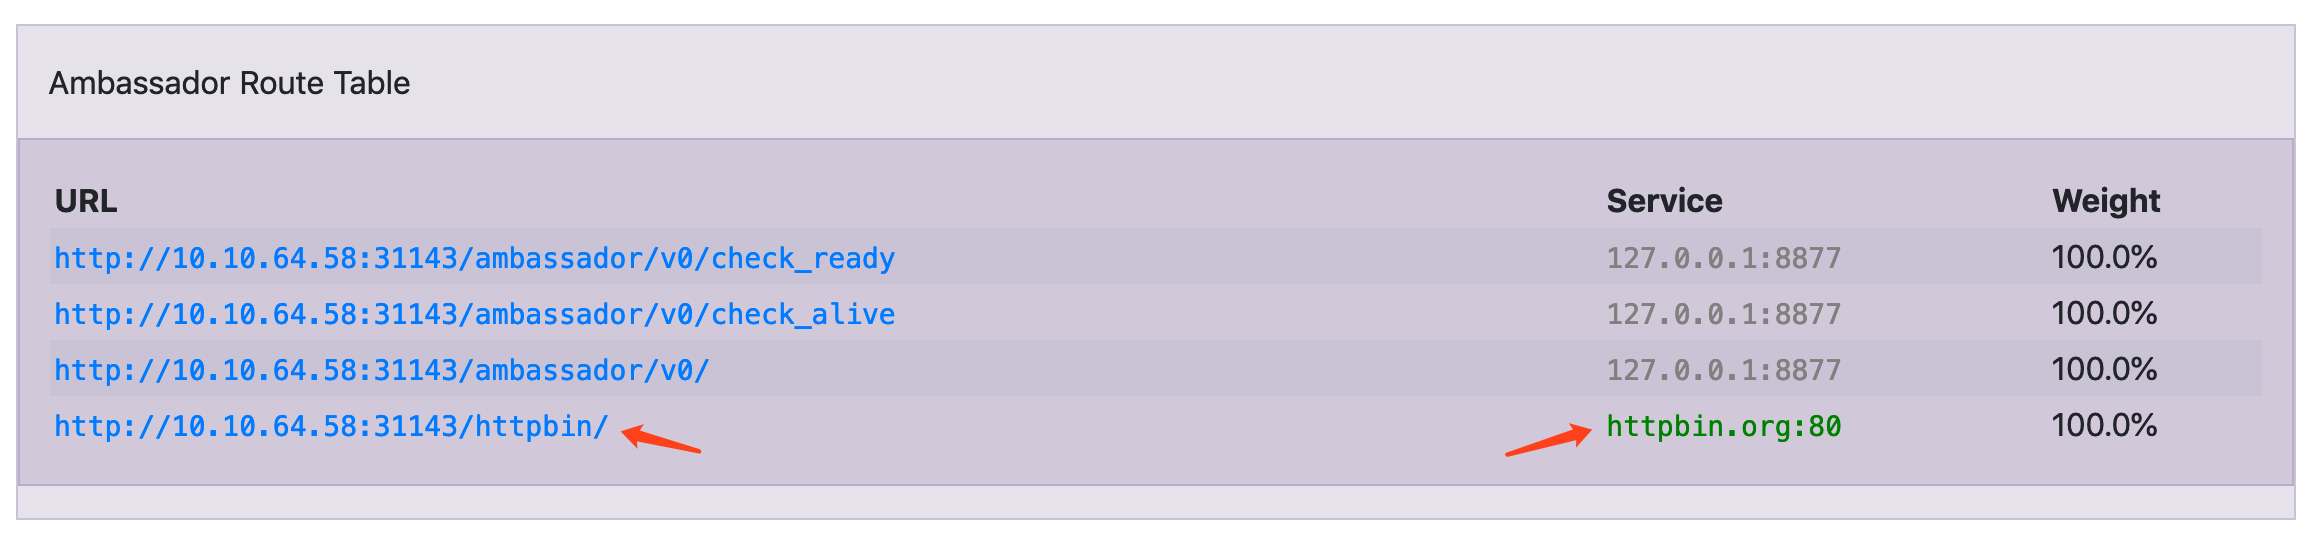
这时候访问 http://10.10.64.58:32020/httpbin/ ,返回的内容来自httpbin.org。
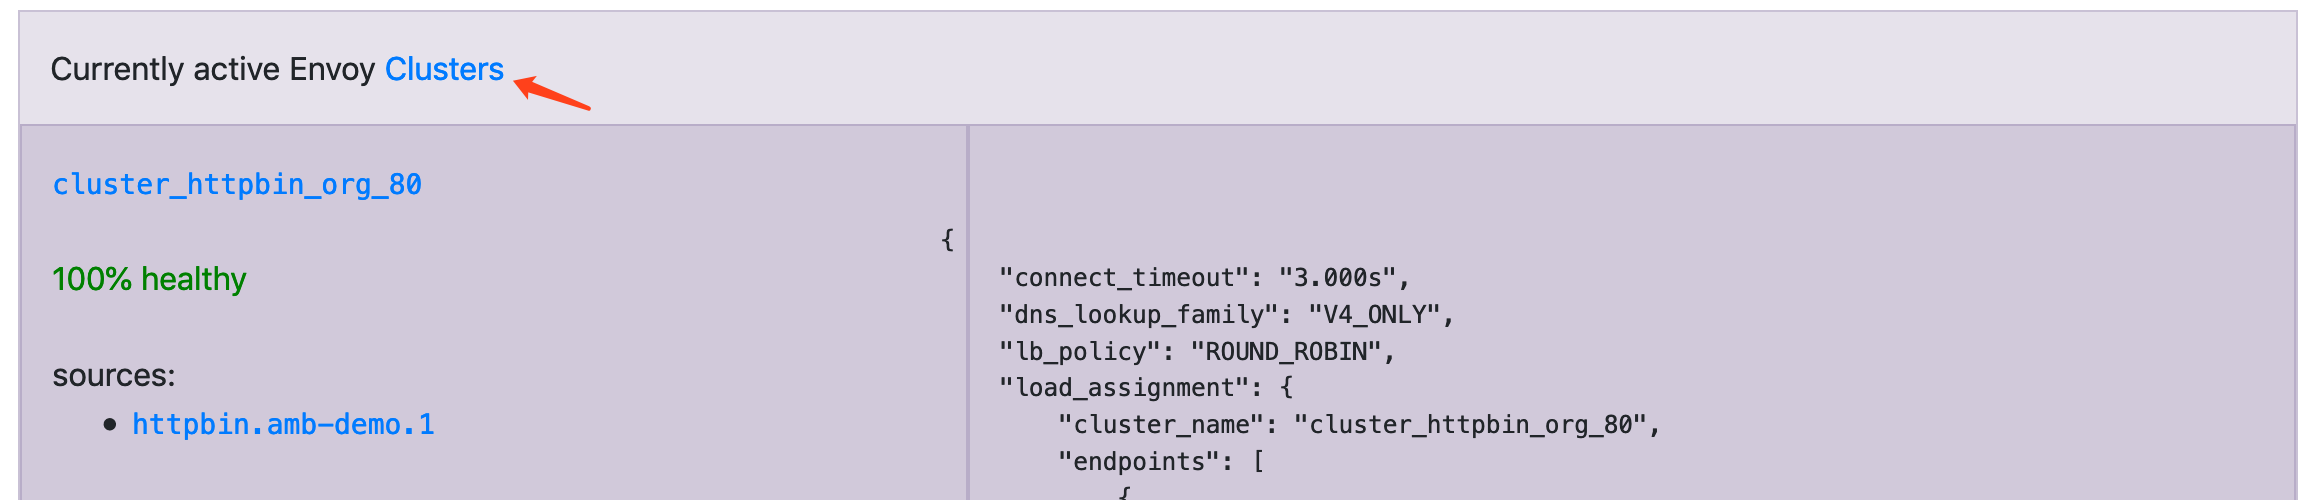
在管理页面 http://10.10.64.58:31143/ambassador/v0/diag/ 中可以看到对应的Route:
点击route可以看到该route在envoy中的对应配置,和envoy结合的比较好:

代理到集群内部
在集群内创建一个deployment,和对应的service,将前缀为/qotm/的请求代理到集群内的Pod:
---
apiVersion: v1
kind: Service
metadata:
  name: qotm
  annotations:
    getambassador.io/config: |
      ---
      apiVersion: ambassador/v1
      kind:  Mapping
      name:  qotm_mapping
      prefix: /qotm/
      service: qotm
spec:
  selector:
    app: qotm
  ports:
  - port: 80
    name: http-qotm
    targetPort: http-api
---
apiVersion: extensions/v1beta1
kind: Deployment
metadata:
  name: qotm
spec:
  replicas: 1
  strategy:
    type: RollingUpdate
  template:
    metadata:
      labels:
        app: qotm
    spec:
      containers:
      - name: qotm
        image: datawire/qotm:1.2
        ports:
        - name: http-api
          containerPort: 5000
        readinessProbe:
          httpGet:
            path: /health
            port: 5000
          initialDelaySeconds: 30
          periodSeconds: 3
        resources:
          limits:
            cpu: "0.1"
            memory: 100Mi
支持的功能
Authentication、SSO(收费版)、Rate limiting、Advanced Rate Limiting(收费版)、Tracing、gRPC、Access Control(收费版)。
Authentication
认证通过对接第三方认证服务实现,在kubernetes中创建认证服务对应的Service,Authentication中提供的认证服务要求所有转发过来的url都带有/extauth/前缀,带有[/extauth/]qotm/quote/前缀的请求需要认证,其它请求直接返回通过。部署方法如下:
# 在kubernetes中部署认证服务(部署在kubernetes外部也可以,和service匹配就行)
$ ./kubectl.sh apply -f https://www.getambassador.io/yaml/demo/demo-auth.yaml

# 启用认证服务
$ ./kubectl.sh apply -f https://www.getambassador.io/yaml/demo/demo-auth-enable.yaml
启用认证服务就是在service中添加下面的注解,这个注解是加到认证服务的service上的,根据文档中介绍推断,把它添加到其它servcie中一样会生效,这是一个全局的配置:
  annotations:
    getambassador.io/config: |
      ---
      apiVersion: ambassador/v1
      kind:  AuthService
      name:  authentication
      auth_service: "example-auth:3000"
      path_prefix: "/extauth"
      allowed_request_headers:
      - "x-qotm-session"
      allowed_authorization_headers:
      - "x-qotm-session"
ambassador会自动在转发给认证服务的url上添加path_prefix指定的前缀。
认证服务配置是全局的!这一点需要特别注意,所有经ambassador到service的请求都会被转发给认证服务,无论目标servcie是哪个namespace,由认证服务器判断哪些请求需要认证(如果无法连接认证服务,返回503)。
在一个echo回显服务中添加下面的注解:
apiVersion: v1
kind: Service
metadata:
  annotations:
    getambassador.io/config: |
      ---
      apiVersion: ambassador/v1
      kind:  Mapping
      name:  echo_mapping
      service: echo:80
      host: "echo.com"
  creationTimestamp: 2019-03-25T07:21:35Z
  ...
没有为echo做任何认证相关配置的情况下,访问echo的请求被转发到认证服务,由此可以判断ambassador的认证设置是全局的:
$ curl -v   -H "Host: echo.com" 10.10.173.203:32020/qotm/quote/
*   Trying 10.10.173.203...
* TCP_NODELAY set
* Connected to 10.10.173.203 (10.10.173.203) port 32020 (#0)
> GET /qotm/quote/ HTTP/1.1
> Host: echo.com
> User-Agent: curl/7.54.0
> Accept: */*
>
< HTTP/1.1 401 Unauthorized
< www-authenticate: Basic realm="Ambassador Realm"
< content-length: 0
< date: Mon, 13 May 2019 09:26:39 GMT
< server: envoy
<
* Connection #0 to host 10.10.173.203 left intact
认证服务是中心化的、强制的、单一的,这不是一个好的设计,应当让每个servcie可以自主选择不同的认证服务,并且只将需要认证的请求转发给认证服务,而不是由认证服务判断哪些需要认证。
初步印象
Ambassador使用的 service 注解比较复杂,分为Module、Mapping等不同类型, Module是全局配置,作用于所有的service,Mapping只作用于它所在的service,Mapping是一个比较复杂的配置,包含大量的配置项。
还有三种Resolver类型用于指定发现方式,Resolver是全局配置在Mapping中引用:KubernetesServiceResolver(默认的)、KubernetesEndpointResolver、ConsulResolver。
好的方面
- 在管理页面中除了可以看到工作状态,还能看到envoy的配置信息以及错误信息,排查问题很方便,值得借鉴;
- 支持指定不同的服务发现方式和服务发现的粒度,从kubernetes中发现可以选择service级别或者endpoint级别。
不好的方面
- Ambassador的全局配置和局部配置使用同样的配置方式,容易带来管理上的混乱
- 配置都在annatation中不方便查看和修改, 应该使用CRD的方式;
- Ambassador默认的服务发现模式有问题,默认采用service级别,下发到envoy中的地址是
servicename:port,这导致ambasaador实例必须和目标服务位于同一个namespace中; - 认证功能是全局设置的,且全部转发给认证服务判断,这不是一个好的设计,增加了认证服务的压力和额外的开销;
- 一些高级特性需要付费,目前尚不确定Pro版本和免费版本是不是用的同一套代码,不知道在免费版本上进行二次开发的难度如何;
- 完全绕过了kuberntes的ingress。
采用service级别的服务发现时,envoy必须和被代理的服务位于同一个namespace中,否则envoy无法访问service:
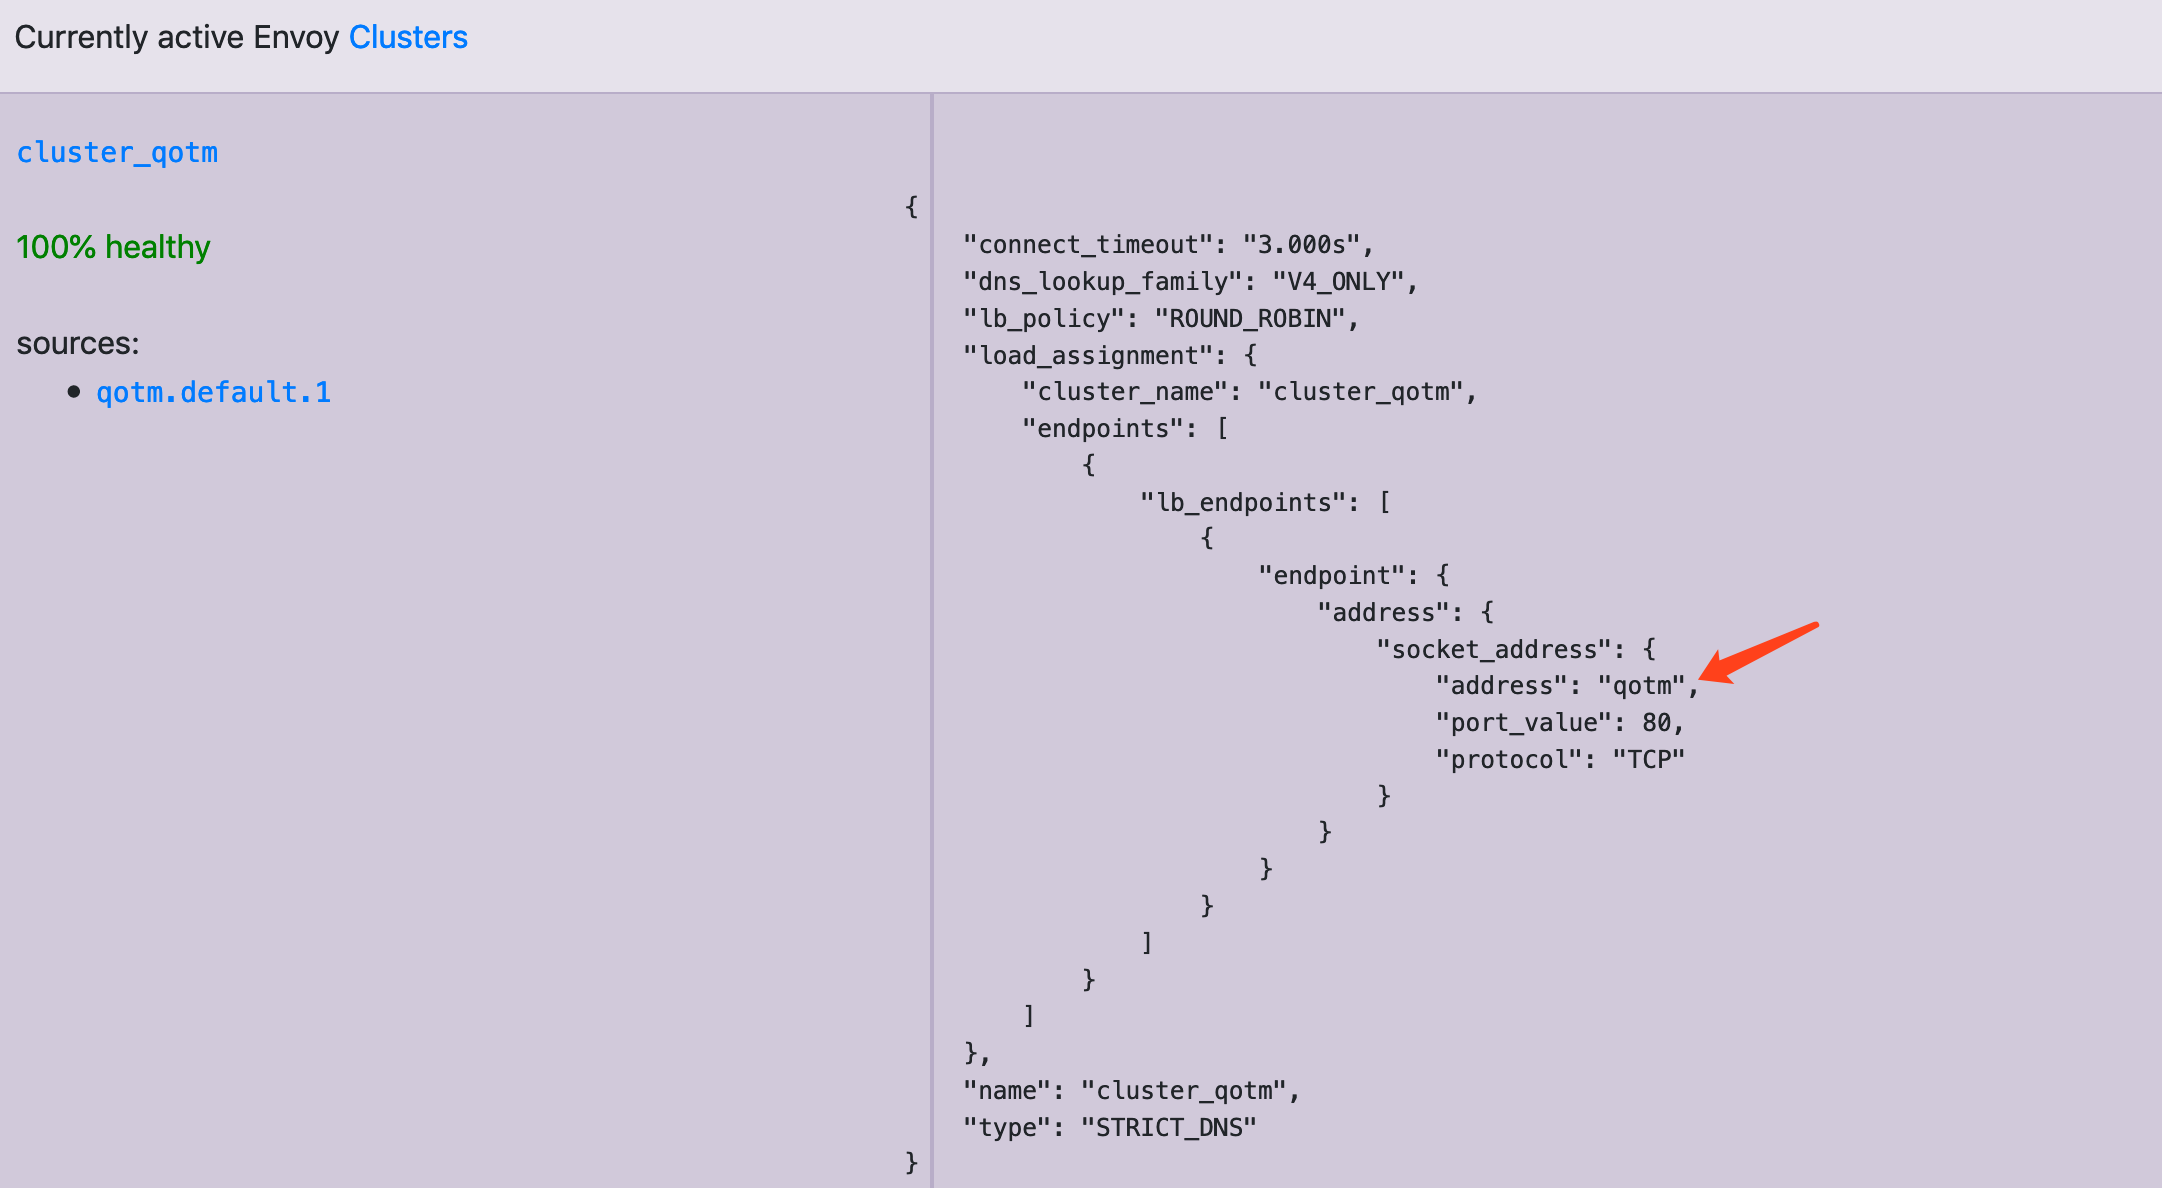
ambassardor监听的是集群中所有service的annotations,这就带来了冲突,导致其它namespace中的服务能被发现,但不能访问。 文档中提到可以通过The Kubernetes Endpoint Resolver设置为endpoint级别的发现,用下面的配置试验没有成功,状态页面显示没有找到endpoints,可能是我的用法不对:
apiVersion: v1
kind: Service
metadata:
  annotations:
    getambassador.io/config: |
      ---
      apiVersion: ambassador/v1
      kind: KubernetesEndpointResolver
      name: endpoint
      ---
      apiVersion: ambassador/v1
      kind:  Mapping
      name:  qotm_mapping
      prefix: /qotm/
      service: qotm
      resolver: endpoint
  creationTimestamp: 2019-05-10T11:01:47Z
  name: qotm
  namespace: default
spec:
  clusterIP: 172.16.118.227
  ports:
  - name: http-qotm
    port: 80
    protocol: TCP
    targetPort: http-api
  selector:
    app: qotm
  sessionAffinity: None
  type: ClusterIP

推荐阅读
Copyright @2011-2019 All rights reserved. 转载请添加原文连接,合作请加微信lijiaocn或者发送邮件: [email protected],备注网站合作
友情链接: Some Online Tools Develop by Me 系统软件 程序语言 运营经验 水库文集 网络课程 微信网文