学习 firebase 的基础用法
目录
- 目录
- 说明
- firebase cli 安装
- 初始化项目-本地模拟器配置和启动
- 创建一个 web 应用并使用模拟器的登录
- 连接 firestore 模拟器
- 连接云函数
- 云函数内连接 emulators
- 本地模拟器的不足
- 参考
说明
Google 推出的 Firebase 是一个后端即服务(BaaS)平台,提供了一系列工具和服务,提供了实时数据库、身份验证、云存储、托管、分析等功能。 对于起步阶段的独立开发者来说,firebase 太香了,不仅能够快速完成开发,还有各种免费额度可用。
firebase cli 安装
本地安装 firebase cli:
curl -sL firebase.tools | bash
# mac 上用 brew 安装
brew install firebase-cli
安装 firebase 之后需要现在命令行登录,登录成功之后才能顺利执行后续的操作:
firebase login
初始化项目-本地模拟器配置和启动
初始化 firebase 项目,在交互 shell 中选择要使用的功能。不必在首次 init 的时候全部选择,后续可以追加。追加方式就是再次执行 firebase init 命令,然后勾选没有选择的 feature。firbase 会识别目录中已经有的 feature,并询问是否覆盖等。
firebase init
# 当前只勾选 ❯◉ Emulators: Set up local emulators for Firebase products
init 过程中会提示使用已有的项目还是新建项目。这里的项目是 firebase 控制台中项目,是 firebase 管理的基本单位。如果新建项目直接在命令行输入项目名称即可。 项目创建成功之后就会进入到 Emulator 的设置阶段,勾选需要模拟提供的 feature。先只试验一个,勾选: Authentication Emulator。然后都用默认配置一路回车。 按照上面操作之后,目录中会生成 firebase.json 文件,内容如下。可以看到里面当前只有 emulators 的配置。
{
  "emulators": {
    "auth": {
      "port": 9099
    },
    "ui": {
      "enabled": true
    },
    "singleProjectMode": true
  }
}
启动模拟器:
firebase emulators:start
emulators 运行还需要本地有 java 命令,否则会运行出错:Error: Process ‘java -version’ has exited with code 1. Please make sure Java is installed and on your system PATH. 在 mac 上用 brew 安装 openjdk 即可。
创建一个 web 应用并使用模拟器的登录
在 firebase 控制台进入前面创建的 emulator-demo-by-lijiao 项目,然后在其中添加一个网页应用。应用注册成功后网页上会显示 firebase sdk 的添加方式。
在本地创建下面的 web 应用目录结构,这里主要示意 firebase 的使用,创建一个没有用任何前端框架的 HTML 页面:
web
├── css
│   └── style.css
├── index.html
└── js
    ├── app.js
    └── auth.js
直接让 ai 完成一个登录 demo,比如在 cursor 中输入下面的提示词:
在 @Web 中实现通过 firebase-auth sdk登录的功能。登录入口在网页上方的状态条中,登录成功后在状态条中显示用户的头像和名称,以及退出操作。
这是一个非常简单的示例程序,不要有太复杂的设计。firebase的sdk为:
<script type="module">
  // Import the functions you need from the SDKs you need
  import { initializeApp } from "https://www.gstatic.com/firebasejs/12.4.0/firebase-app.js";
  // TODO: Add SDKs for Firebase products that you want to use
  // https://firebase.google.com/docs/web/setup#available-libraries

  // Your web app's Firebase configuration
  const firebaseConfig = {
    apiKey: "AIzaSyAJ-XNjEA8SwDwOGWARb14pY914yjzOZrU",
    authDomain: "emulator-demo-by-lijiao.firebaseapp.com",
    projectId: "emulator-demo-by-lijiao",
    storageBucket: "emulator-demo-by-lijiao.firebasestorage.app",
    messagingSenderId: "48290651283",
    appId: "1:48290651283:web:acf773639573016aba8166"
  };

  // Initialize Firebase
  const app = initializeApp(firebaseConfig);
</script>
连接模拟器的方法:
import { connectAuthEmulator, getAuth } from "https://www.gstatic.com/firebasejs/12.4.0/firebase-auth.js";
// 获取认证实例
const auth = getAuth(app);

// 环境检测 - 自动判断是否为开发环境
const isDevelopment = window.location.hostname === 'localhost' ||
                     window.location.hostname === '127.0.0.1' ||
                     window.location.hostname.includes('localhost');
// 在开发环境中连接模拟器
if (isDevelopment) {
    connectAuthEmulator(auth, "http://127.0.0.1:9099");
    console.log('🔧 已连接到 Firebase Auth 模拟器');
}
连接 firestore 模拟器
在项目目录中再次执行 firebase init,回车再次进入 emulator 设置,增加勾选 firestore emulator。执行结束后,firebase.json 中增加了下面的 firestore 相关的配置:
    "firestore": {
      "port": 8080
    }
firestore 连接模拟器:
import { connectFirestoreEmulator, getFirestore } from "https://www.gstatic.com/firebasejs/12.4.0/firebase-firestore.js";
// 获取 Firestore 实例
const db = getFirestore(app);
connectFirestoreEmulator(db, "127.0.0.1", 8080);
console.log('🔧 已连接到 Firebase Firestore 模拟器');
连接云函数
执行 firebase init 勾选函数,在项目中添加云函数特性以及云函数的实现,
❯◉ Functions: Configure a Cloud Functions directory and its files
执行完成后,firebase.json 中增加了一段 functions 设置。本地目录中多了一个 functions 目录,这个 functions 目录中就是云函数的地方。下面的配置文件中 source 就是指定云函数的代码目录。
  "functions": [
    {
      "source": "functions",
      "codebase": "default",
      "ignore": [
        "node_modules",
        ".git",
        "firebase-debug.log",
        "firebase-debug.*.log",
        "*.local"
      ],
      "predeploy": [
        "npm --prefix \"$RESOURCE_DIR\" run lint",
        "npm --prefix \"$RESOURCE_DIR\" run build"
      ]
    }
  ]
云函数项目结构
在 firebase init 过程中云函数语言选择了 TypeScript,所以升成的 functions 目录中是一个 typescript 项目。
functions
├── package.json       # npm 命令使用的配置文件,定义了项目脚本和依赖包
├── src                # 函数实现代码
│   └── index.ts
├── tsconfig.dev.json  # typescript 的开发环境编译配置
└── tsconfig.json      # typescript 的生产环境编译配置
node 本地多版本
升成的 functions/package.json 中有一个 engines 配置里面指定使用 node 22。为了避免出现一些奇怪奇怪的错误信息,把本地的 node 更换成相同版本。用 nvm 在本地管理多有个 node 版本。
brew install nvm
mkdir ~/.nvm
在 .bashrc 或其 .zshrc 等文件中添加:
export NVM_DIR="$HOME/.nvm"
[ -s "/opt/homebrew/opt/nvm/nvm.sh" ] && \. "/opt/homebrew/opt/nvm/nvm.sh"  # This loads nvm
[ -s "/opt/homebrew/opt/nvm/etc/bash_completion.d/nvm" ] && \. "/opt/homebrew/opt/nvm/etc/bash_completion.d/nvm"  # This loads nvm bash_completion
查看可安装的 node 版本:
nvm ls-remote
安装 22 版本:
nvm install v22.20.0
可以在本地用 nvm ls 查看本地已经有的 node 版本以及用 nvm ls 切换。用 ndoe –version 查看目前的 node 版本。
$ node --version
v22.20.0
项目管理操作
npm install 安装项目依赖,执行完成后,本地目录中出现的 node_modules 目录中就是项目依赖的其他代码库。这个目录默认已经添加在 .gitingore 中,不会被提交到远端 git 仓库中。其他常用的操作命令在 package.json 中都已经定义了,用 “npm run XX“ 直接运行对应的命令即可。比如在模拟器中运行:
"serve": "npm run build && firebase emulators:start --only functions",
实现 helloworld 函数
云函数的调用触发可以有多种方式,比如通过 http 请求、sdk 调用、数据库事件等等。
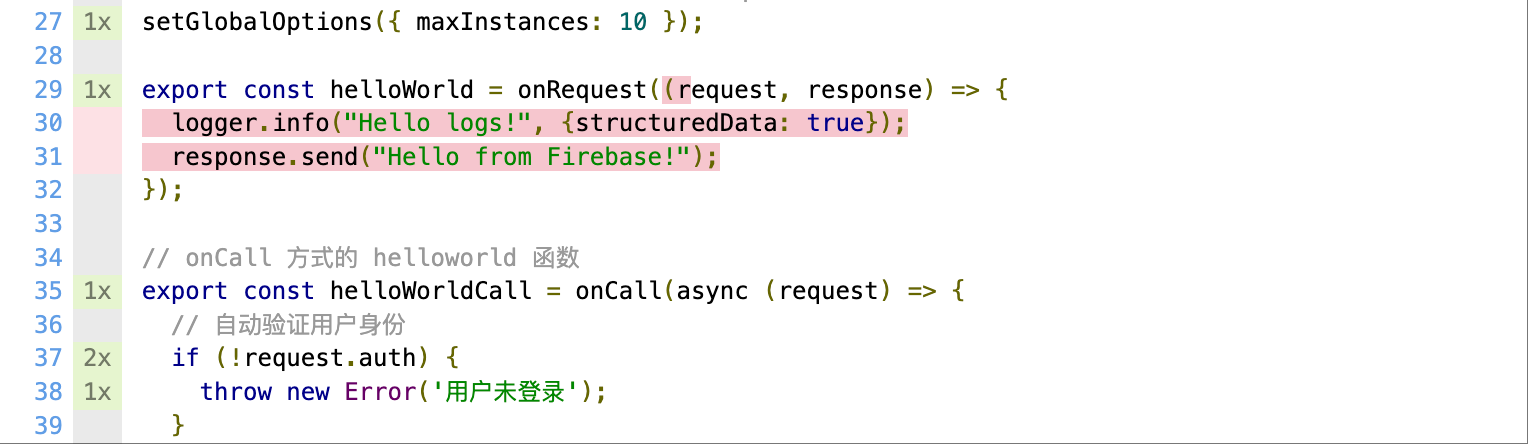
通过 http 请求触发的云函数实现如下,它是一个 onRequest 函数:
import {onRequest} from "firebase-functions/https";

export const helloWorld = onRequest((request, response) => {
  logger.info("Hello logs!", {structuredData: true});
  response.send("Hello from Firebase!");
});
启动函数模拟器之后,本地可以通过访问地址 http://函数模拟器地址/项目ID/部署区域/函数名 触发,如下:
npm run serve # 本地函数模拟器启动
$ curl http://localhost:5001/emulator-demo-by-lijiao/us-central1/helloWorld
Hello from Firebase!%
在模拟器的页面中的 Logs tab 中可以看到函数执行时输出的日志。
实现 helloworld 函数 - Oncall
http 触发的方式需要自行在云函数的实现代码里完成用户身份校验等一系列操作,如果 firesdk 调用的方式触发,firebase 会自动完成用户身份认证解析等。
import {onCall} from "firebase-functions/https";

// onCall 方式的 helloworld 函数
export const helloWorldCall = onCall(async (request) => {
  // 自动验证用户身份
  if (!request.auth) {
    throw new Error('用户未登录');
  }

  const user = request.auth;
  logger.info(`用户 ${user.uid} 调用了 helloWorldCall 函数`, {
    uid: user.uid
  });

  return {
    message: `Hello ${user.uid}!`,
    uid: user.uid,
    timestamp: new Date().toISOString()
  };
});
原则上在 firebase shell 中可以直接调用定义的云函数的,但是因为参数构造的问题,在 shell 直接调用经常会遇到一些错误。更好的方式是直接编写离线的单元测试代码。
$ npm run shell
云函数的离线单元测试
这里用 jest 测试框架,先在开发环境安装 jest 以及它的 ts 描述文件。如果 package.json 的 devDependencies 没有 firebase-functions-test 还需要用同样方式安装。
npm install --save-dev jest ts-jest @types/jest
npm install --save-dev firebase-functions-test # 通常默认已经安装
然后创建 index.ts 对应的 index.test.ts 文件,在里面编写单元测试代码。jest 具有 mock 各种远端调用函数的能力,示例的 helloWorldCall 很简单,目前用不上 mock 相关的设置。如果被测试的函数中有对其它外部系统的调用,是可以通过 jest 的 mock 能力进行打桩测试的。
import functions from 'firebase-functions-test';
import { helloWorldCall } from './index';

// 初始化 Firebase Functions 测试环境
const test = functions();

describe('helloWorldCall', () => {
  // 清理测试环境
  afterEach(() => {
    test.cleanup();
  });

  it('应该返回用户信息当用户已登录', async () => {
    // 模拟已登录用户
    const mockRequest = {
      auth: {
        uid: 'test-user-123',
        email: '[email protected]',
        token: {} as any,
        rawToken: 'mock-raw-token'
      },
      data: {},
      rawRequest: {} as any,
      acceptsStreaming: false
    };

    // 使用 firebase-functions-test 包装函数
    const wrapped = test.wrap(helloWorldCall);
    const result = await wrapped(mockRequest);

    // 验证结果
    expect(result).toEqual({
      message: 'Hello test-user-123!',
      uid: 'test-user-123',
      timestamp: expect.any(String)
    });
  });

  it('应该抛出错误当用户未登录', async () => {
    // 模拟未登录用户
    const mockRequest = {
      auth: undefined,
      data: {},
      rawRequest: {} as any,
      acceptsStreaming: false
    };

    // 使用 firebase-functions-test 包装函数
    const wrapped = test.wrap(helloWorldCall);

    // 验证函数抛出错误
    await expect(wrapped(mockRequest)).rejects.toThrow('用户未登录');
  });
});
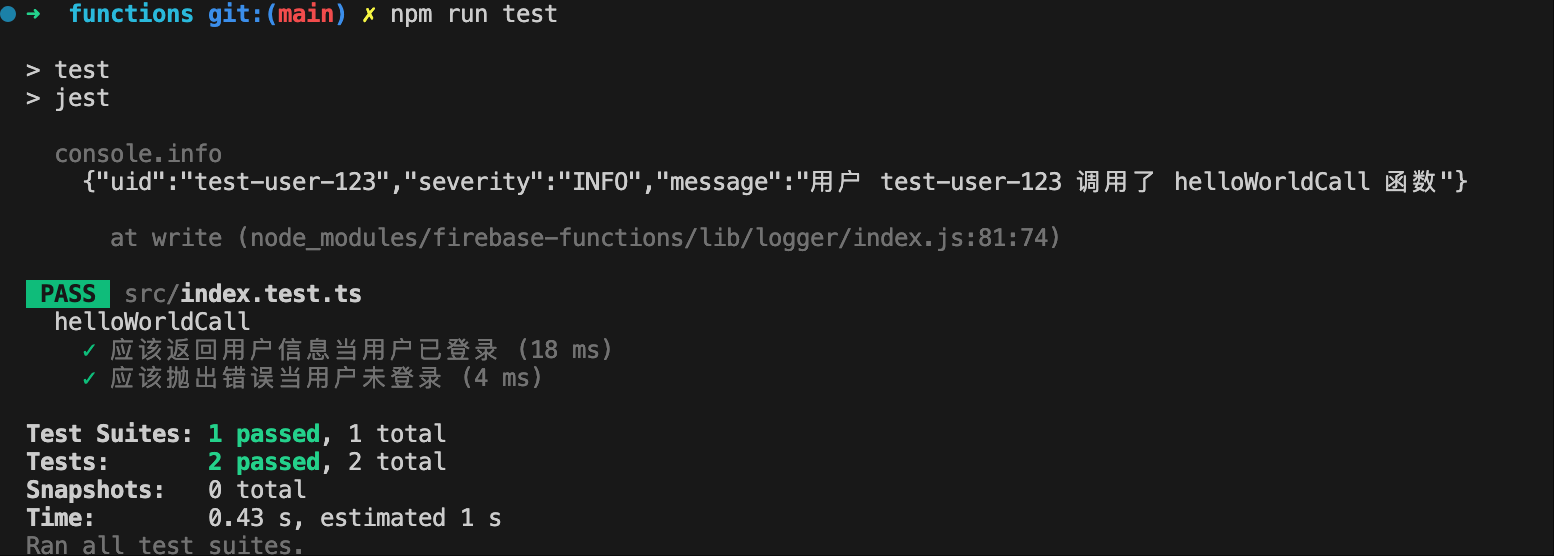
单元测试代码用 jest 驱动执行,package.json 中添加是脚本命令,test 是执行测试,test:coverage 是查看测试覆盖率。
    "test": "jest",
    "test:coverage": "jest --coverage"
还需要编写 jest.config.js,在里面配置 jest 要执行的测试代码:
module.exports = {
  preset: 'ts-jest',
  testEnvironment: 'node',
  roots: ['<rootDir>/src'],
  testMatch: ['**/__tests__/**/*.ts', '**/?(*.)+(spec|test).ts'],
  transform: {
    '^.+\\.ts$': 'ts-jest',
  },
  collectCoverageFrom: [
    'src/**/*.ts',
    '!src/**/*.d.ts',
    '!src/**/*.test.ts',
    '!src/**/*.spec.ts',
  ],
  coverageDirectory: 'coverage',
  coverageReporters: ['text', 'lcov', 'html']
};
然后执行 npm run test 和 npm run test:coverage 就可以看到测试结果和测试覆盖情况。
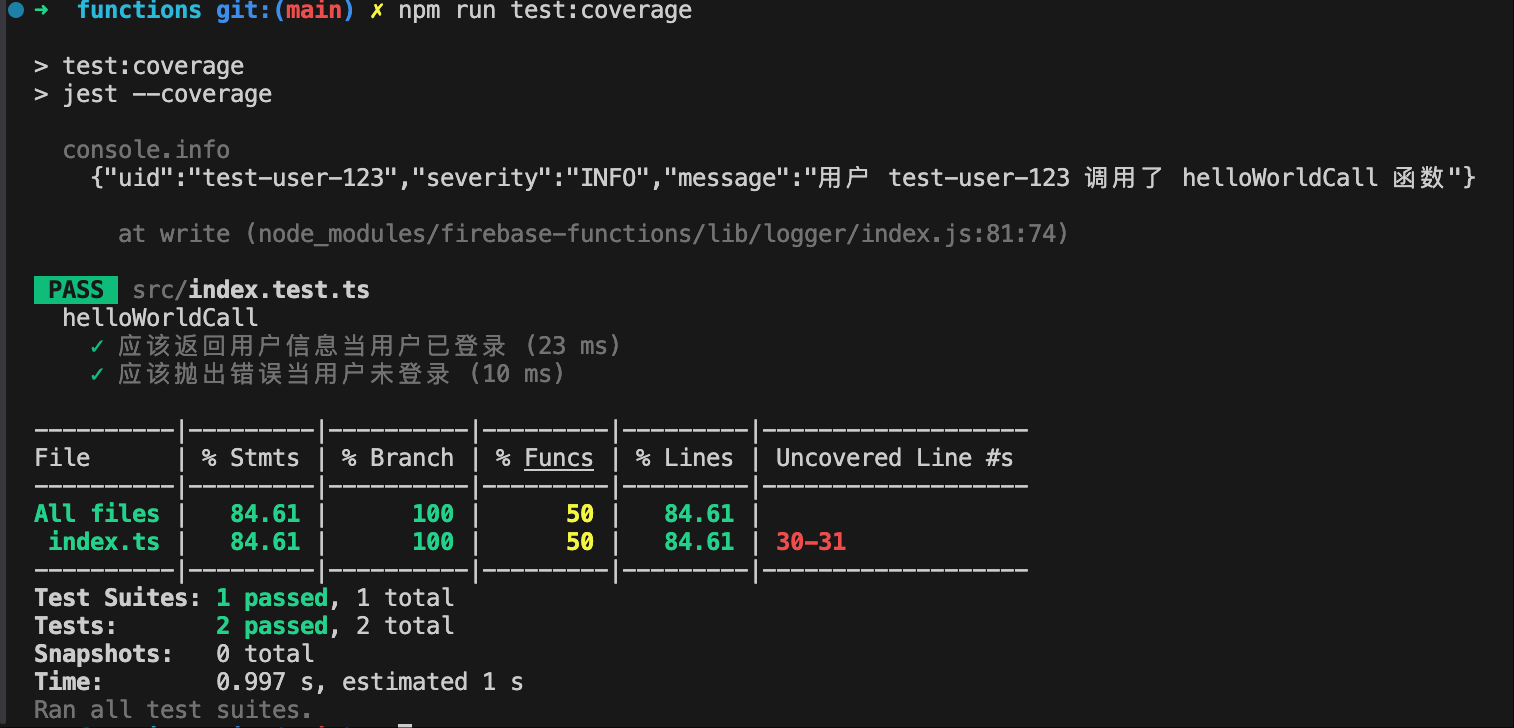
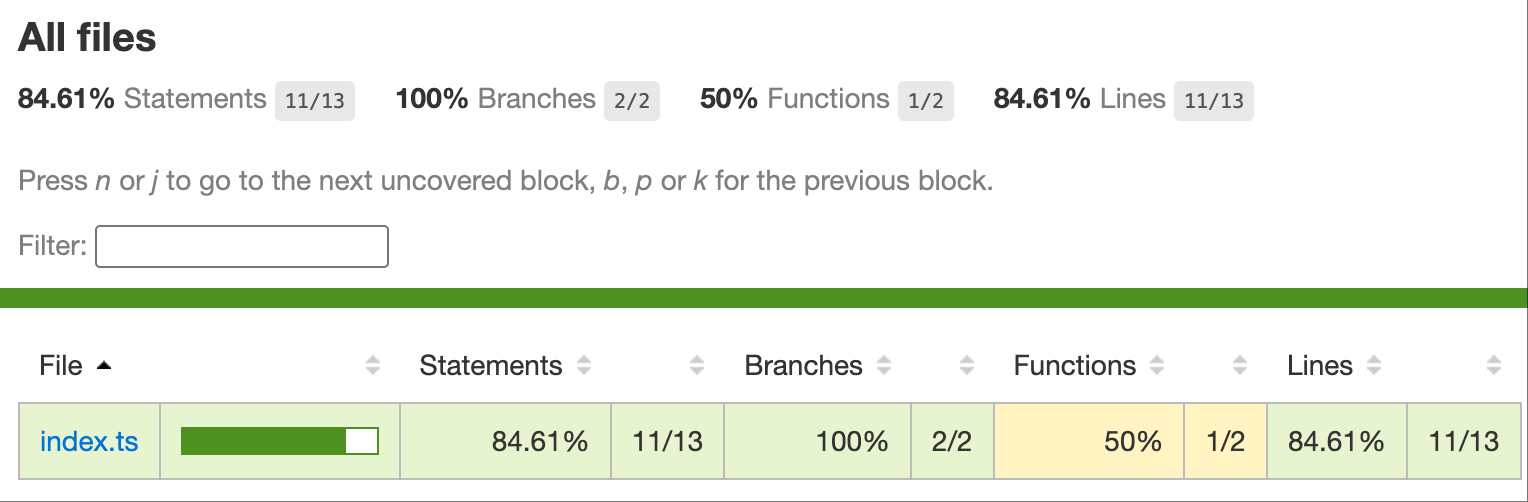
npm run test:coverage 运行结束后,会在本地升成一个 coverage 目录,这个目录是测试覆盖率的可视化展示,直接用浏览器打开里面的 index.html:
通过 sdk 调用云函数
回到 firebaase 项目目录中,执行 firebase init 在 emulator 中添加 function 模拟。设置完成后 ,firebase.json 中多出 functions 设置:
    "functions": {
      "port": 5001
    }
还是通过 firebase emulators:start 启动本地模拟器。
在前面创建的 web 应用中用 sdk 调用运行在 emualtor 中的云函数。同样也是现在 web/js/app.js 添加到模拟器的 function 的连接:
import { getFunctions, connectFunctionsEmulator } from "https://www.gstatic.com/firebasejs/12.4.0/firebase-functions.js";

// 获取 Functions 实例
const functions = getFunctions(app);

if (isDevelopment) {
    connectFunctionsEmulator(functions, "127.0.0.1", 5001);
    console.log('🔧 已连接到 Firebase Functions 模拟器');
}
云函数内连接 emulators
云函数内的执行的代码拥有整个项目的 editor 权限,能够直接访问同一个项目内的其它 firebase 服务,比如 cloud storage,firestore database 等等。本地模拟器在启动云函数时候会自动设置环境变量,使云函数中代码访问 firebase 对应服务时连接到模拟器地址。
可以在入口文件 index.ts 打印下注入的模拟器服务地址情况:
const isEmulator = process.env.FUNCTIONS_EMULATOR === "true";
if (isEmulator) {
  console.log("🔥 已连接到 Firebase Emulator");
  console.log(`  - Firestore: ${process.env.FIRESTORE_EMULATOR_HOST}`);
  console.log(`  - Storage: ${process.env.FIREBASE_STORAGE_EMULATOR_HOST}`);
} else {
  console.log("🔥 连接到 Firebase 生产环境");
}
本地模拟器的不足
如果用 cloud storage 的 getSingedUrl 获取 object 文件的临时连接,在本地模拟器运行时可能遇到 SigningError。 gemini 的解释是:Cloud Storage 模拟器旨在模拟 Storage 的存储功能,但它通常不会完全模拟 Google Cloud Storage 的所有底层 IAM 基础设施,特别是用于生成 Signed URL 的复杂签名服务。
如果您只是想在本地测试函数的主体逻辑,并不需要真正的 Signed URL。一种解决方法是在云函数中判断运行环境,如果是在模拟器运行不执行 singed 操作而是返回无签名的 url。本地代码可以通过模拟器的无签名 url 把文件上传到本地到模拟器。通过无签名的 url 上传文件相当于直接操作本地的 cloud storage,会遇到 cloud storage 的 rule 检查。为了代码一致,本地可以把 cloud storage 的规则完全放开:
rules_version = '2';
service firebase.storage {
  match /b/{bucket}/o {
    // 临时设置:允许所有人读写所有文件 (仅限本地测试!)
    match /{allPaths=**} {
      allow read, write: if true;
    }
  }
}
gemini 还给了一种方法是设置 GOOGLE_APPLICATION_CREDENTIALS。这种方式能生成的 singedUrl,但是本地的模拟器本身不支持 signedUrl 的验证,不能在本地完成完整流程测试。
在functions/index.js 或入口文件中,确保 Admin SDK 是通过 firebase-admin 初始化的。停止模拟器,然后在运行 firebase emulators:start 之前,设置 GOOGLE_APPLICATION_CREDENTIALS 环境变量。环境变量指定的 JSON 文件从 Firebase Console -> Project settings -> Service accounts -> Generate new private key 下载。
# 假设您已下载了您的测试项目服务账号 JSON 文件
# 尽管是本地模拟器,但 GCS 签名还是需要这个 GCLOUD 凭据
export GOOGLE_APPLICATION_CREDENTIALS="/path/to/your/service-account-key.json"

# 启动模拟器
firebase emulators:start
参考

推荐阅读
Copyright @2011-2019 All rights reserved. 转载请添加原文连接,合作请加微信lijiaocn或者发送邮件: [email protected],备注网站合作
友情链接: Some Online Tools Develop by Me 系统软件 程序语言 运营经验 水库文集 网络课程 微信网文