【视频】超级账本HyperLedger: Fabric-CA的使用演示(两个组织一个Orderer三个Peer)
目录
- 目录
- 说明
- 相关笔记
- 注意事项
- 启动fabric-ca
- 生成fabric-ca admin的凭证
- 创建联盟
- 为每个组织准备msp
- 注册example.com的管理员[email protected]
- 注册org1.example.com的管理员[email protected]
- 注册org2.example.com的管理员[email protected]
- 各个组织分别使用自己的Admin账户创建其它账号
- 重新部署
- 更新用户的证书以及后续操作
- 接下来…
- 参考
说明
这是“网易云课堂IT技术快速入门学院”使用的素材。操作、配置文件和代码讲解视频在网易云课堂《HyperLeger Fabric进阶实战课》第四章中。这里将演示如何使用FabricCA为每个组件和用户生成证书,并在多服务器、多节点的环境中应用。这里的操作是在超级账本Hyperledger:Fabric项目的多服务器、全手动部署的基础上进行的,
如果对下面的操作有不清楚的地方,可以参阅超级账本HyperLedger的FabricCA的用法讲解。如果文档理解起来有困难,可以参考网易云课堂中的视频教程:
超级账本HyperLedger视频教程:HyperLedger Fabric全手动、多服务器部署与进阶教程–“主页”中可领优惠券
FabricCA可以使用下面的部署方式:
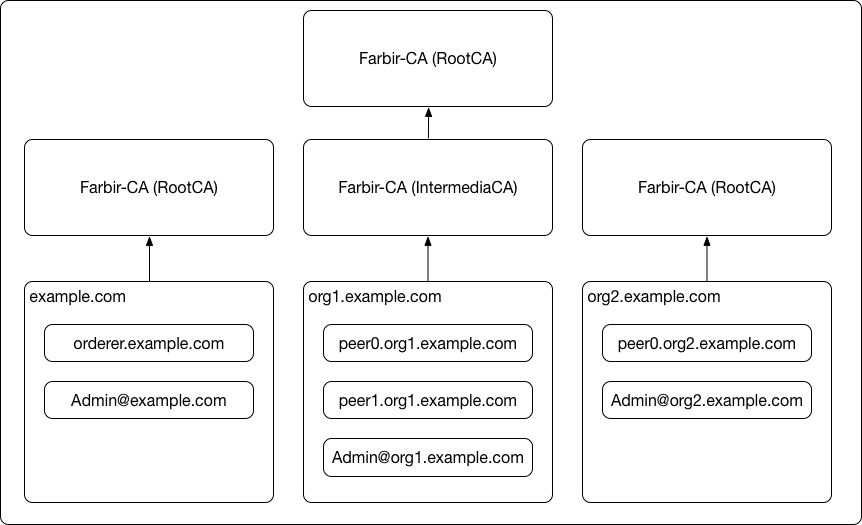
这里做了简化,只部署了一个FabricCA作为rootCA。
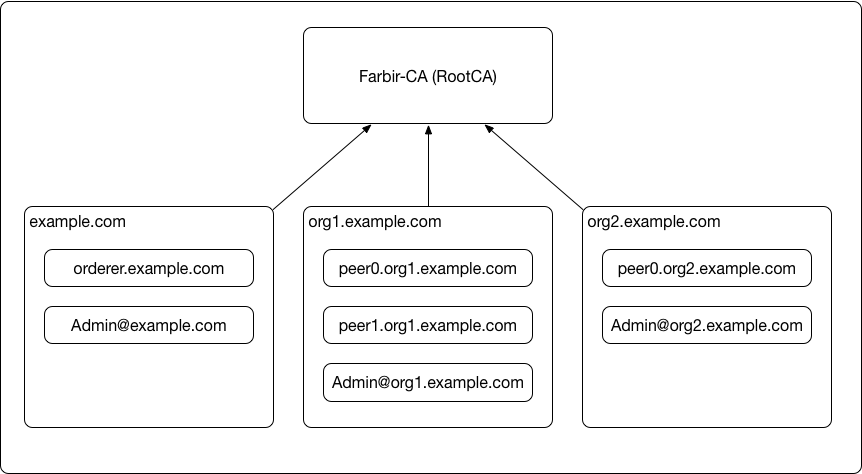
下面的操作中将创建一个由两个组织org1.example.com和org2.example.com组成的的联盟。
另外还有一个组织example.com用来部署orderer。
组织example.com部署了一个solo模式的orderer。(多个orderer的部署方式,以后探讨)
orderer.example.com
组织org1.example.com部署了两个peer:
peer0.org1.example.com
peer1.org1.example.com
组织org2.example.com部署了一个peer:
peer0.org2.example.com
每个组织都要有一个Admin用户,每个组件(peer/orderer)也需要一个账号,因此需要通过FabricCA创建7个用户:
example.com:       [email protected]       orderer.example.com
org1.example.com:  [email protected]  peer0.org1.example.com  peer1.org1.example.com
org2.example.com:  [email protected]  peer0.org2.example.com
这里只创建了Admin用户和每个组件的账号,普通用户的创建方式相同,只是普通用户的证书不需要添加到目标组件的admincerts目录中。
或者说一个用户的证书如果被添加到了对应组织或组件的msp/admincerts目录中,那么这个用户就称为对应的管理员。
相关笔记
视频演示:
- 【视频】Fabric的全手动、多服务器部署教程
- 【视频】使用Ansible进行Fabric多节点分布式部署(实战)
- 【视频】Fabric从1.1.0升级到1.2.0
- 【视频】Fabric使用kafka进行区块排序(共识)
- 【视频】为Fabric的Peer节点配置CouchDB
- 【视频】Fabric-CA的使用演示(两个组织一个Orderer三个Peer)
- 【视频】Fabric的Chaincode(智能合约、链码)开发、使用示
- 【视频】Fabric Go SDK的使用
- 【视频】Fabric nodejs SDK的使用
- 【视频】Fabric进阶,在已有的Channel中添加新的组织
文字介绍:
- 超级账本工作组旗下项目介绍
- Fabric掰开揉碎,一文解惑
- Fabric的基本概念与基础用法
- FabricCA的基本概念与用法讲解
- FabricCA的级联使用(InterMediateCA)
- Fabric Chaincode(智能合约、链码)开发方法
- Fabric Channel配置的读取转换
- Explorer安装使用
- Cello部署和使用
问题汇总:
- Fabric部署过程时遇到的问题汇总
- Fabric的Chaincode开发过程中遇到的问题
- Fabric Node.js SDK使用时遇到的问题
- Fabric Golang SDK使用时遇到的问题
- Fabric 1.2.0使用时遇到的问题
注意事项
实践过程中,可能遇到各种各样的问题,可以到知识星球“区块链实践分享”中提问(见页尾),或者直接加我微信lijiaocn。
我会把比较典型的问题汇总:超级账本HyperLedger的Fabric项目部署过程时遇到的问题
特别提醒,如果你的操作做到了一半,需要推倒重做,一定将目标机器上的每个组件中的data目录删除:
rm -rf /opt/app/fabric/orderer/data
rm -rf /opt/app/fabric/peer/data
否则这些残留的数据会干扰运行,导致各种各样的情况。
启动fabric-ca
fabirc-ca的编译:
$ go get -u github.com/hyperledger/fabric-ca
$ cd $GOPATH/src/github.com/hyperledger/fabric-ca
$ make fabric-ca-server
$ make fabric-ca-client
$ ls bin/
fabric-ca-client  fabric-ca-server
这里将fabric-ca部署在/opt/app/fabric-ca/server目录中:
mkdir -p /opt/app/fabric-ca/server
cp -rf $GOPATH/src/github.com/hyperledger/fabric-ca/bin/*  /opt/app/fabric-ca/server
ln -s /opt/app/fabric-ca/server/fabric-ca-client  /usr/bin/fabric-ca-client
直接启动ca,fabric-ca admin的名称为admin,密码为pass。(这里只是演示,生产中使用,你需要根据实际的情况配置)
cd /opt/app/fabric-ca/server
./fabric-ca-server start -b  admin:pass &
如果有删除联盟和删除用户的需求,需要用下面的方式启动:
cd /opt/app/fabric-ca/server
./fabric-ca-server start -b admin:pass --cfg.affiliations.allowremove  --cfg.identities.allowremove &
注意:这里只是演示用法,直接用sqlite存储用户信息,生产中,请根据情况配置ldap或者mysql等数据库:HyperLedger FabricCA Config Database and LDAP。
生成fabric-ca admin的凭证
下面的操作在《hyperledger的fabric项目的全手动部署》中创建的fabric-deploy目录中进行后续操作。
cd ~/fabric-deploy
mkdir fabric-ca-files
生成fabric-ca admin的凭证,用-H参数指定client目录:
mkdir -p `pwd`/fabric-ca-files/admin
fabric-ca-client enroll -u http://admin:pass@localhost:7054 -H `pwd`/fabric-ca-files/admin
也可以用环境变量FABRIC_CA_CLIENT_HOME指定了client的工作目录,生成的用户凭证将存放在这个目录中。
export FABRIC_CA_CLIENT_HOME=`pwd`/fabric-ca-files/admin
mkdir -p $FABRIC_CA_CLIENT_HOME
fabric-ca-client enroll -u http://admin:pass@localhost:7054
为了防止混乱,后面的演示操作中,都直接用-H指定目录。
创建联盟
上面的启动方式默认会创建两个组织:
$ fabric-ca-client  -H `pwd`/fabric-ca-files/admin  affiliation list
2018/05/07 02:36:46 [INFO] [::1]:56148 GET /affiliations 200 0 "OK"
affiliation: .
   affiliation: org2
      affiliation: org2.department1
   affiliation: org1
      affiliation: org1.department1
      affiliation: org1.department2
为了查看信息的时候,看到的输出比较简洁,用下面的命令将其删除:
fabric-ca-client -H `pwd`/fabric-ca-files/admin  affiliation remove --force  org1
fabric-ca-client -H `pwd`/fabric-ca-files/admin  affiliation remove --force  org2
执行下面命令创建联盟:
fabric-ca-client  -H `pwd`/fabric-ca-files/admin  affiliation add com
fabric-ca-client  -H `pwd`/fabric-ca-files/admin  affiliation add com.example
fabric-ca-client  -H `pwd`/fabric-ca-files/admin  affiliation add com.example.org1
fabric-ca-client  -H `pwd`/fabric-ca-files/admin  affiliation add com.example.org2
注意:联盟是有层级的。
创建联盟如下:
$ fabric-ca-client -H `pwd`/fabric-ca-files/admin  affiliation list
2018/04/28 15:19:34 [INFO] 127.0.0.1:38160 GET /affiliations 201 0 "OK"
affiliation: com
   affiliation: com.example
      affiliation: com.example.org1
      affiliation: com.example.org2
为每个组织准备msp
就是从Fabric-CA中,读取出用来签署用户的根证书等。
为example.com准备msp,将ca证书等存放example.com组织的目录中:
mkdir -p ./fabric-ca-files/example.com/msp
fabric-ca-client getcacert -M `pwd`/fabric-ca-files/example.com/msp    //-M需要指定绝对路径
命令执行结束后,会在fabric-ca-files/example.com/msp得到文件:
$ tree fabric-ca-files/example.com/msp/
example.com/msp/
|-- cacerts
|   `-- localhost-7054.pem
|-- intermediatecerts
|   `-- localhost-7054.pem
|-- keystore
`-- signcerts
注意通过getcacert得到msp目录中只有CA证书,而且这里没有使用中间CA,fabric-ca-files/example.com/msp/intermediatecerts/localhost-7054.pem是一个空文件。
同样的方式为org1.example.com获取msp:
mkdir -p fabric-ca-files/org1.example.com/msp
fabric-ca-client getcacert -M `pwd`/fabric-ca-files/org1.example.com/msp
为org2.example.com准备msp:
mkdir -p ./fabric-ca-files/org2.example.com/msp
fabric-ca-client getcacert -M `pwd`/fabric-ca-files/org2.example.com/msp
这里是用getcacert为每个组织准备需要的ca文件,在生成创始块的时候会用到。
在1.1.0版本的fabric-ca中,只会生成用户在操作区块链的时候用到的证书和密钥,不会生成用来加密grpc通信的证书。
这里复用之前用cryptogen生成的tls证书,需要将验证tls证书的ca添加到msp目录中,如下:
cp -rf certs/ordererOrganizations/example.com/msp/tlscacerts  fabric-ca-files/example.com/msp/
cp -rf certs/peerOrganizations/org1.example.com/msp/tlscacerts/ fabric-ca-files/org1.example.com/msp/
cp -rf certs/peerOrganizations/org2.example.com/msp/tlscacerts/ fabric-ca-files/org2.example.com/msp/
如果在你的环境中,各个组件域名的证书,是由第三方CA签署的,就将第三方CA的根证书添加到msp/tlscacerts目录中。
组织的msp目录中,包含都是CA根证书,分别是TLS加密的根证书,和用于身份验证的根证书。另外还需要admin用户的证书,后面的操作中会添加。
注册example.com的管理员[email protected]
可以直接用命令行(命令比较长,这里用\\截断了):
fabric-ca-client register --id.name [email protected] --id.type client --id.affiliation "com.example.org1"  \
    --id.attrs '"hf.Registrar.Roles=client,orderer,peer,user","hf.Registrar.DelegateRoles=client,orderer,peer,user",\
                 hf.Registrar.Attributes=*,hf.GenCRL=true,hf.Revoker=true,hf.AffiliationMgr=true,hf.IntermediateCA=true,role=admin:ecert'
也可以将命令行参数写在fabric-ca admin的配置文件fabric-ca-files/admin/fabric-ca-client-config.yaml中。
$ ls fabric-ca-files/admin/admin/
fabric-ca-client-config.yaml  msp
为了演示清楚,这里使用修改配置文件的方式,将fabric-ca-files/admin/fabric-ca-client-config.yaml其中的id部分修改为:
id:
  name: [email protected]
  type: client
  affiliation: com.example
  maxenrollments: 0
  attributes:
    - name: hf.Registrar.Roles
      value: client,orderer,peer,user
    - name: hf.Registrar.DelegateRoles
      value: client,orderer,peer,user
    - name: hf.Registrar.Attributes
      value: "*"
    - name: hf.GenCRL
      value: true
    - name: hf.Revoker
      value: true
    - name: hf.AffiliationMgr
      value: true
    - name: hf.IntermediateCA
      value: true
    - name: role
      value: admin
      ecert: true
注意最后一行role属性,是我们自定义的属性,对于自定义的属性,要设置certs,在配置文件中需要单独设置ecert属性为true或者false。如果在命令行中,添加后缀:ecert表示true,例如:
fabric-ca-client register --id.affiliation "com.example.org1" --id.attrs "role=admin:ecert"
ecert的含义见超级账本HyperLedger的fabricCA的用法讲解。
直接执行下面的命令,即可完成用户[email protected]注册,注意这时候的注册使用fabricCA的admin账号完成的:
fabric-ca-client register -H `pwd`/fabric-ca-files/admin --id.secret=password
如果不用--id.secret指定密码,会自动生成密码。
其它配置的含义是用户名为[email protected],类型是client,它能够管理com.example.*下的用户,如下:
--id.name  [email protected]                           //用户名
--id.type client                                       //类型为client
--id.affiliation "com.example"                         //权利访问
hf.Registrar.Roles=client,orderer,peer,user            //能够管理的用户类型
hf.Registrar.DelegateRoles=client,orderer,peer,user    //可以授权给子用户管理的用户类型
hf.Registrar.Attributes=*                              //可以为子用户设置所有属性
hf.GenCRL=true                                         //可以生成撤销证书列表
hf.Revoker=true                                        //可以撤销用户
hf.AffiliationMgr=true                                 //能够管理联盟
hf.IntermediateCA=true                                 //可以作为中间CA
role=admin:ecert                                       //自定义属性
完成注册之后,还需生成[email protected]凭证:
$ mkdir -p ./fabric-ca-files/example.com/admin
$ fabric-ca-client enroll -u http://[email protected]:password@localhost:7054  -H `pwd`/fabric-ca-files/example.com/admin
$ ls ./fabric-ca-files/example.com/admin
fabric-ca-client-config.yaml  msp/
这时候可以用[email protected]的身份查看联盟:
$ fabric-ca-client affiliation list -H `pwd`/fabric-ca-files/example.com/admin
2018/04/28 15:35:10 [INFO] 127.0.0.1:38172 GET /affiliations 201 0 "OK"
affiliation: com
   affiliation: com.example
      affiliation: com.example.org1
      affiliation: com.example.org2
最后将[email protected]的证书复制到example.com/msp/admincerts/中:
mkdir fabric-ca-files/example.com/msp/admincerts/
cp fabric-ca-files/example.com/admin/msp/signcerts/cert.pem  fabric-ca-files/example.com/msp/admincerts/
只有这样,才能具备管理员权限。
注册org1.example.com的管理员[email protected]
为org1.example.com的管理员[email protected]准备一个目录:
cd ~/fabric-deploy
mkdir -p ./fabric-ca-files/org1.example.com/admin
将fabric-ca-files/admin/fabric-ca-client-config.yaml其中的id部分修改为:
id:
  name: [email protected]
  type: client
  affiliation: com.example.org1
  maxenrollments: 0
  attributes:
    - name: hf.Registrar.Roles
      value: client,orderer,peer,user
    - name: hf.Registrar.DelegateRoles
      value: client,orderer,peer,user
    - name: hf.Registrar.Attributes
      value: "*"
    - name: hf.GenCRL
      value: true
    - name: hf.Revoker
      value: true
    - name: hf.AffiliationMgr
      value: true
    - name: hf.IntermediateCA
      value: true
    - name: role
      value: admin
      ecert: true
注册:
fabric-ca-client register -H `pwd`/fabric-ca-files/admin --id.secret=password
生成凭证:
$ fabric-ca-client enroll -u http://[email protected]:password@localhost:7054  -H `pwd`/fabric-ca-files/org1.example.com/admin
$ ls ./fabric-ca-files/org1.example.com/admin
fabric-ca-client-config.yaml  msp/
查看联盟:
$ fabric-ca-client affiliation list -H `pwd`/fabric-ca-files/org1.example.com/admin
2018/05/04 15:42:53 [INFO] 127.0.0.1:51298 GET /affiliations 201 0 "OK"
affiliation: com
   affiliation: com.example
      affiliation: com.example.org1
注意与[email protected]的区别,这里只能看到组织com.example.org1
将[email protected]的证书复制到org1.example.com的msp/admincerts中:
mkdir fabric-ca-files/org1.example.com/msp/admincerts/
cp fabric-ca-files/org1.example.com/admin/msp/signcerts/cert.pem  fabric-ca-files/org1.example.com/msp/admincerts/
在[email protected]目录中也需要创建msp/admincerts目录,通过peer命令操作fabric的时候会要求admincerts存在:
mkdir fabric-ca-files/org1.example.com/admin/msp/admincerts/     # 注意是org1.example.com/admin目录
cp fabric-ca-files/org1.example.com/admin/msp/signcerts/cert.pem  fabric-ca-files/org1.example.com/admin/msp/admincerts/
另外,这里没有使用中间CA,将intermediatecerts中的空文件删除,否则peer会提示Warning:
rm fabric-ca-files/org1.example.com/admin/msp/intermediatecerts/*
注册org2.example.com的管理员[email protected]
为org2.example.com的管理员[email protected]准备一个目录:
cd ~/fabric-deploy
mkdir -p ./fabric-ca-files/org2.example.com/admin
将fabric-ca-files/admin/fabric-ca-client-config.yaml其中的id部分修改为:
id:
  name: [email protected]
  type: client
  affiliation: com.example.org2
  maxenrollments: 0
  attributes:
    - name: hf.Registrar.Roles
      value: client,orderer,peer,user
    - name: hf.Registrar.DelegateRoles
      value: client,orderer,peer,user
    - name: hf.Registrar.Attributes
      value: "*"
    - name: hf.GenCRL
      value: true
    - name: hf.Revoker
      value: true
    - name: hf.AffiliationMgr
      value: true
    - name: hf.IntermediateCA
      value: true
    - name: role
      value: admin
      ecert: true
注册:
fabric-ca-client register -H `pwd`/fabric-ca-files/admin --id.secret=password
生成凭证:
$ fabric-ca-client enroll -u http://[email protected]:password@localhost:7054  -H `pwd`/fabric-ca-files/org2.example.com/admin
$ ls ./fabric-ca-files/org2.example.com/admin
fabric-ca-client-config.yaml  msp/
查看联盟:
$ fabric-ca-client affiliation list -H `pwd`/fabric-ca-files/org2.example.com/admin
2018/05/02 16:49:00 [INFO] 127.0.0.1:50828 GET /affiliations 201 0 "OK"
affiliation: com
   affiliation: com.example
      affiliation: com.example.org2
[email protected]只能看到组织com.example.org2。
将[email protected]的证书复制到org2.example.com的msp/admincerts中:
mkdir fabric-ca-files/org2.example.com/msp/admincerts/
cp fabric-ca-files/org2.example.com/admin/msp/signcerts/cert.pem  fabric-ca-files/org2.example.com/msp/admincerts/
在[email protected]中也需要创建msp/admincerts目录,通过peer命令操作fabric的时候会要求admincerts存在:
mkdir fabric-ca-files/org2.example.com/admin/msp/admincerts/
cp fabric-ca-files/org2.example.com/admin/msp/signcerts/cert.pem  fabric-ca-files/org2.example.com/admin/msp/admincerts/
另外,这里没有使用中间CA,将intermediatecerts中的空文件删除,否则peer会提示Warning:
rm fabric-ca-files/org2.example.com/admin/msp/intermediatecerts/*
各个组织分别使用自己的Admin账户创建其它账号
example.com、org1.example.com、org2.example.com三个组织这时候可以分别使用自己的Admin账号创建子账号。
orderer.example.com
使用[email protected]注册账号orderer.example.com。注意这时候指定的目录是fabric-ca-files/example.com/admin/。
修改fabric-ca-files/example.com/admin/fabric-ca-client-config.yaml:
id:
  name: orderer.example.com
  type: orderer
  affiliation: com.example
  maxenrollments: 0
  attributes:
    - name: role
      value: orderer
      ecert: true
注册以及生成凭证:
fabric-ca-client register -H `pwd`/fabric-ca-files/example.com/admin --id.secret=password
mkdir ./fabric-ca-files/example.com/orderer
fabric-ca-client enroll -u http://orderer.example.com:password@localhost:7054 -H `pwd`/fabric-ca-files/example.com/orderer
将[email protected]的证书复制到fabric-ca-files/example.com/orderer/msp/admincerts:
mkdir fabric-ca-files/example.com/orderer/msp/admincerts
cp fabric-ca-files/example.com/admin/msp/signcerts/cert.pem fabric-ca-files/example.com/orderer/msp/admincerts/
peer0.org1.example.com
使用[email protected]注册账号peer0.org1.example.com。这时候指定的目录是fabric-ca-files/org1.example.com/admin/。
修改fabric-ca-files/org1.example.com/admin/fabric-ca-client-config.yaml:
id:
  name: peer0.org1.example.com
  type: peer
  affiliation: com.example.org1
  maxenrollments: 0
  attributes:
    - name: role
      value: peer
      ecert: true
注册以及生成凭证:
fabric-ca-client register -H `pwd`/fabric-ca-files/org1.example.com/admin --id.secret=password
mkdir ./fabric-ca-files/org1.example.com/peer0
fabric-ca-client enroll -u http://peer0.org1.example.com:password@localhost:7054 -H `pwd`/fabric-ca-files/org1.example.com/peer0
将[email protected]的证书复制到fabric-ca-files/org1.example.com/peer0/msp/admincerts:
mkdir fabric-ca-files/org1.example.com/peer0/msp/admincerts
cp fabric-ca-files/org1.example.com/admin/msp/signcerts/cert.pem fabric-ca-files/org1.example.com/peer0/msp/admincerts/
peer1.org1.example.com
使用[email protected]注册账号peer1.org1.example.com。这时候指定的目录是fabric-ca-files/org1.example.com/admin/。
修改fabric-ca-files/org1.example.com/admin/fabric-ca-client-config.yaml:
id:
  name: peer1.org1.example.com
  type: peer
  affiliation: com.example.org1
  maxenrollments: 0
  attributes:
    - name: role
      value: peer
      ecert: true
注册以及生成凭证:
fabric-ca-client register -H `pwd`/fabric-ca-files/org1.example.com/admin --id.secret=password
mkdir ./fabric-ca-files/org1.example.com/peer1
fabric-ca-client enroll -u http://peer1.org1.example.com:password@localhost:7054 -H `pwd`/fabric-ca-files/org1.example.com/peer1
将[email protected]的证书复制到fabric-ca-files/org1.example.com/peer1/msp/admincerts:
mkdir fabric-ca-files/org1.example.com/peer1/msp/admincerts
cp fabric-ca-files/org1.example.com/admin/msp/signcerts/cert.pem fabric-ca-files/org1.example.com/peer1/msp/admincerts/
peer0.org2.example.com
使用[email protected]注册账号peer0.org2.example.com。这时候指定的目录是fabric-ca-files/org2.example.com/admin/。
修改fabric-ca-files/org2.example.com/admin/fabric-ca-client-config.yaml:
id:
  name: peer0.org2.example.com
  type: peer
  affiliation: com.example.org2
  maxenrollments: 0
  attributes:
    - name: role
      value: peer
      ecert: true
注册以及生成凭证:
fabric-ca-client register -H `pwd`/fabric-ca-files/org2.example.com/admin --id.secret=password
mkdir ./fabric-ca-files/org2.example.com/peer0
fabric-ca-client enroll -u http://peer0.org2.example.com:password@localhost:7054 -H `pwd`/fabric-ca-files/org2.example.com/peer0
将[email protected]的证书复制到fabric-ca-files/org2.example.com/peer0/msp/admincerts:
mkdir fabric-ca-files/org2.example.com/peer0/msp/admincerts
cp fabric-ca-files/org2.example.com/admin/msp/signcerts/cert.pem fabric-ca-files/org2.example.com/peer0/msp/admincerts/
重新部署
然后在hyperledger的fabric项目的全手动部署执行结束后得到的fabric-deploy目录基础上,进行下面的操作。
修改configtx.yaml,将其中的msp路径修改为通过fabric-ca创建的msp目录:
Profiles:
    TwoOrgsOrdererGenesis:
        Orderer:
            <<: *OrdererDefaults
            Organizations:
                - *OrdererOrg
        Consortiums:
            SampleConsortium:
                Organizations:
                    - *Org1
                    - *Org2
    TwoOrgsChannel:
        Consortium: SampleConsortium
        Application:
            <<: *ApplicationDefaults
            Organizations:
                - *Org1
                - *Org2
Organizations:
    - &OrdererOrg
        Name: OrdererOrg
        ID: OrdererMSP
        MSPDir: ./fabric-ca-files/example.com/msp
    - &Org1
        Name: Org1MSP
        ID: Org1MSP
        MSPDir: ./fabric-ca-files/org1.example.com/msp
        AnchorPeers:
            - Host: peer0.org1.example.com
              Port: 7051
    - &Org2
        Name: Org2MSP
        ID: Org2MSP
        MSPDir: ./fabric-ca-files/org2.example.com/msp
        AnchorPeers:
            - Host: peer0.org2.example.com
              Port: 7051
Orderer: &OrdererDefaults
    OrdererType: solo
    Addresses:
        - orderer.example.com:7050
    BatchTimeout: 2s
    BatchSize:
        MaxMessageCount: 10
        AbsoluteMaxBytes: 99 MB
        PreferredMaxBytes: 512 KB
    Kafka:
        Brokers:
            - 127.0.0.1:9092
    Organizations:
Application: &ApplicationDefaults
    Organizations:
注意configtx.yaml中使用的每个组织的msp,不是组件的或者用户的。这个文件修改后备用,后面使用configtxgen生成新的创世块时会用到这个文件。
更新orderer.example.com/中的msp:
rm -rf orderer.example.com/msp/
cp -rf fabric-ca-files/example.com/orderer/msp orderer.example.com/
更新peer0.org1.example.com的msp:
rm -rf peer0.org1.example.com/msp/
cp -rf fabric-ca-files/org1.example.com/peer0/msp  peer0.org1.example.com/
更新peer1.org1.example.com的msp:
rm -rf peer1.org1.example.com/msp/
cp -rf fabric-ca-files/org1.example.com/peer1/msp  peer1.org1.example.com/
更新peer0.org2.example.com的msp:
rm -rf peer0.org2.example.com/msp/
cp -rf fabric-ca-files/org2.example.com/peer0/msp   peer0.org2.example.com/
然后重新部署下面的组件,参考hyperledger的fabric项目的全手动部署: 开始部署。
重新部署时,注意将各个机器上已经启动的服务停止,并删除原先的文件,data目录一定要清空! 否则会因为以前数据的残留,导致fabric无法正常工作。
scp -r orderer.example.com/*     [email protected]:/opt/app/fabric/orderer/
scp -r peer0.org1.example.com/*  [email protected]:/opt/app/fabric/peer/
scp -r peer1.org1.example.com/*  [email protected]:/opt/app/fabric/peer/
scp -r peer0.org2.example.com/*  [email protected]:/opt/app/fabric/peer/
重新部署完成后不要立即启动,重新生成./genesisblock文件,并上传到orderer.example.com的安装路径中:
./bin/configtxgen -profile TwoOrgsOrdererGenesis -outputBlock ./genesisblock
这里没有使用中间CA,生成genesisblock的时候,会提示:
2018-05-04 16:37:17.788 CST [msp] getPemMaterialFromDir -> WARN 002 Failed reading file /root/fabric-deploy/fabric-ca-files/example.com/msp/intermediatecerts/localhost-7054.pem: no pem content for file /root/fabric-deploy/fabric-ca-files/example.com/msp/intermediatecerts/localhost-7054.pem
将intermediatecerts中的文件删除即可,
rm fabric-ca-files/example.com/msp/intermediatecerts/localhost-7054.pem
rm fabric-ca-files/org1.example.com/msp/intermediatecerts/localhost-7054.pem
rm fabric-ca-files/org2.example.com/msp/intermediatecerts/localhost-7054.pem
如果是通过intermediateCA生成的证书,intermediatecerts中包含中间CA的证书。这里只部署了一个fabric-ca作为rootCA,因此intermediatecerts中是一个空文件。
将生成的genesisblock上传到orderer.example.com:
scp genesisblock [email protected]:/opt/app/fabric/orderer/
可以用下面的命令查看创始块的内容:
./bin/configtxgen -inspectBlock genesisblock
然后重新启动fabric的所有组件。
./orderer
./peer node start
更新用户的证书以及后续操作
因为我们是在hyperledger的fabric项目的全手动部署执行结束后得到的fabric-deploy目录基础上,进行操作的。
所有还要更新一下该目录下用户目录中的msp:
$ rm -rf Admin\@org1.example.com/msp
$ cp -rf fabric-ca-files/org1.example.com/admin/msp Admin\@org1.example.com/
$ cd Admin\@org1.example.com
$ ./peer.sh node status
status:STARTED
2018-05-04 17:03:06.202 CST [main] main -> INFO 001 Exiting.....

$ cd ../
$ rm -rf Admin\@org2.example.com/msp
$ cp -rf fabric-ca-files/org2.example.com/admin/msp Admin\@org2.example.com/
$ cd Admin\@org2.example.com
$ ./peer.sh node status
status:STARTED
2018-05-04 17:08:27.959 CST [main] main -> INFO 001 Exiting.....
重新创建channel,设置anchor peer:
./bin/configtxgen -profile TwoOrgsChannel -outputCreateChannelTx mychannel.tx -channelID mychannel
./bin/configtxgen -profile TwoOrgsChannel -outputAnchorPeersUpdate Org1MSPanchors.tx -channelID mychannel -asOrg Org1MSP
./bin/configtxgen -profile TwoOrgsChannel -outputAnchorPeersUpdate Org2MSPanchors.tx -channelID mychannel -asOrg Org2MSP

cd Admin\@org1.example.com/
./peer.sh channel create -o orderer.example.com:7050 -c mychannel -f ../mychannel.tx --tls true --cafile tlsca.example.com-cert.pem
cp mychannel.block ../Admin\@org2.example.com/    //注意要覆盖原先的文件!
./peer.sh channel join -b mychannel.block
./peer.sh channel join -b mychannel.block   //将peer.sh中的peer0修改为peer1后在执行一次
./peer.sh channel update -o orderer.example.com:7050 -c mychannel -f ../Org1MSPanchors.tx --tls true --cafile ./tlsca.example.com-cert.pem

cd ../Admin\@org2.example.com/
./peer.sh channel join -b mychannel.block
./peer.sh channel update -o orderer.example.com:7050 -c mychannel -f ../Org2MSPanchors.tx --tls true --cafile ./tlsca.example.com-cert.pem
这些操作的含义见: hyperledger的fabric项目的全手动部署-创建channel与peer的设置
后续的合约创建、更新、调用等操作这里就不演示了,请直接查看: hyperledger的fabric项目的全手动部署:安装合约:
go get github.com/lijiaocn/fabric-chaincode-example/demo
./peer.sh chaincode package demo-pack.out -n demo -v 0.0.1 -s -S -p github.com/lijiaocn/fabric-chaincode-example/demo
./peer.sh chaincode signpackage demo-pack.out signed-demo-pack.out
./peer.sh chaincode install ./signed-demo-pack.out
./peer.sh chaincode instantiate -o orderer.example.com:7050 --tls true --cafile ./tlsca.example.com-cert.pem -C mychannel -n demo -v 0.0.1 -c '{"Args":["init"]}' -P "OR('Org1MSP.member','Org2MSP.member')"
./peer.sh chaincode query -C mychannel -n demo -c '{"Args":["attr","role"]}'
./peer.sh chaincode query -C mychannel -n demo -c '{"Args":["attr","hf.Type"]}'
现在,使用Fabric-CA的HyperLedger Fabric部署完成了。
接下来…
超级账本HyperLedger视频教程:Fabric,在已有的Channel中添加新的组织
参考
- Welcome to Hyperledger Fabric CA
- fabric-ca codes
- HyperLedger的fabric项目的全手动部署
- HyperLedger的fabric项目的全手动部署: 开始部署
- HyperLedger的fabric项目的全手动部署-创建channel与peer的设置
- 超级账本HyperLedger的fabricCA的用法讲解
- HyperLedger FabricCA Config Database and LDAP
- HyperLedger的fabric项目的全手动部署: 安装合约
- 超级账本HyperLedger的fabricCA的用法讲解
- 超级账本HyperLedger的Fabric项目部署过程时遇到的问题
- 更多关于超级账本和区块链的文章
- 超级账本HyperLedger视频教程:Fabric,在已有的Channel中添加新的组织

推荐阅读
Copyright @2011-2019 All rights reserved. 转载请添加原文连接,合作请加微信lijiaocn或者发送邮件: [email protected],备注网站合作
友情链接: Some Online Tools Develop by Me 系统软件 程序语言 运营经验 水库文集 网络课程 微信网文